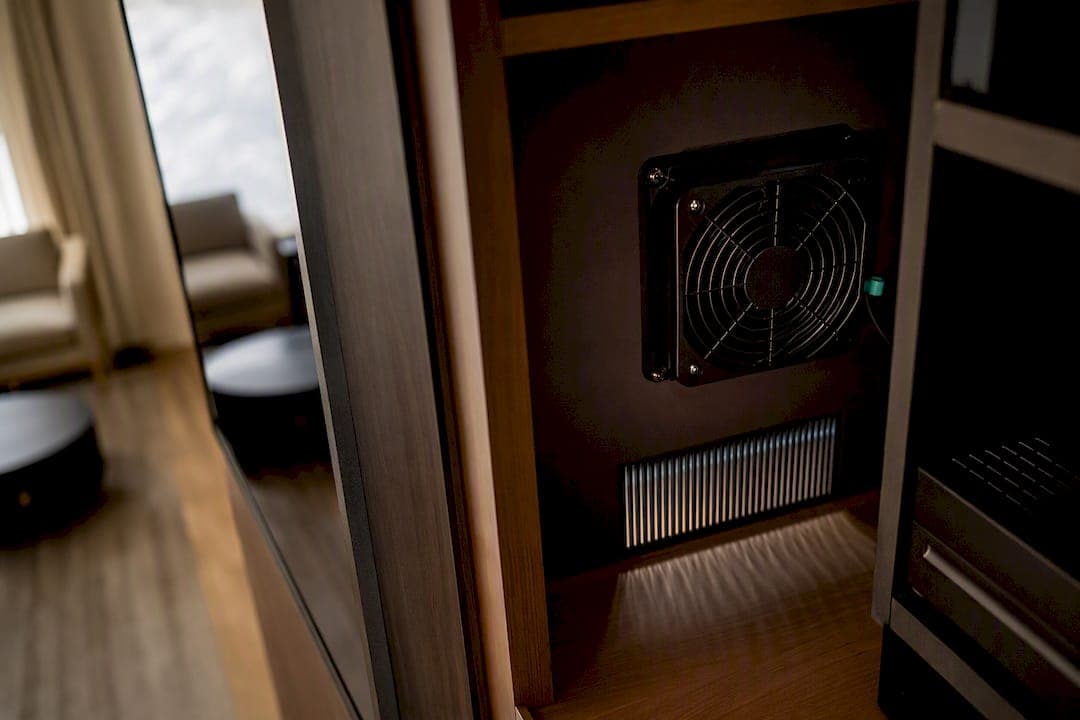
For AV gear sealed inside cabinetry, the fix is always the same: build an intentional intake path and an exhaust path, not just one opening and hope. Passive vents handle light loads like a single streaming box or receiver. Once you're stacking a receiver, a game console, and a cable box together, add a quiet, temperature-controlled fan that only spins up when it's actually needed. Check clearance, confirm the intake and exhaust don't fight each other, and put a thermometer in there before you seal anything shut.
TL;DR:
- Using exhaust-driven ventilation creates a reliable airflow loop that clears hot air effectively, unlike intake-only setups that can pressurize and short-circuit.
- Placement of fans should prioritize a top exhaust combined with a lower intake to work with natural convection, preventing recirculation of hot air.
- For light loads, passive vents are sufficient, but when devices overheat or shut down, active cooling systems like temperature-controlled fans become necessary.
- Proper planning of air intake and exhaust, including clearance and access, should be integrated into the cabinet design before construction to avoid costly retrofits.
- Regular maintenance of fans and filters, along with probe placement and thermostatic control, ensures long-term reliability and effective temperature management.
Table of Contents
- Quick Checklist: Stop the Overheating Right Now
- Why Small Cabinets Trap Heat: Convection, Pressure, and Short-Circuiting
- Passive vs Active Cooling: Matching the Fix to the Heat Load
- Fan Placement That Actually Moves Heat
- Keeping Cooling Fans Quiet Enough for a Living Room
- Plan Ventilation Before You Finish the Cabinet
- What to Actually Look for in Fans, Vents, and Kits
- Installation Mistakes That Force You to Redo Everything
- Keeping the System Working Long After Install
- Practical Design Notes
- The Case for Planning Ventilation Like a System, Not an Afterthought
- Sources
- FAQ
Quick Checklist: Stop the Overheating Right Now
Before buying anything, figure out what's actually generating the heat and where it's trapped. A cabinet with a soundbar and a streaming stick behaves nothing like one holding a receiver, a game console, and a cable box stacked on the same shelf.
Work through these steps in order:
- Inventory the gear. List every device in the cabinet and flag the ones that run hot: AV receivers, gaming consoles, and older cable boxes are usually the worst offenders.
- Map an airflow path. Identify where cool air can enter (a toe-kick gap, a side reveal) and where hot air can leave (a rear opening, a top vent). If you can't name both, you have a sealed box, not a ventilated one.
- Try temporary fixes first. Crack the cabinet doors an inch, add a peel-and-stick passive grille, or clip in a small quiet fan to buy yourself time while you plan a permanent solution.
- Watch for shutdown signs. If a receiver keeps cutting out or a console fan screams under load, passive measures aren't cutting it. That's your signal to move to active cooling or relocate the worst offender to open shelving.
This buys you breathing room. It's not the long-term answer, but it stops the damage while you plan something better.
Why Small Cabinets Trap Heat: Convection, Pressure, and Short-Circuiting
Warm air rises and cool air sinks, but in a cabinet only a couple feet tall, that natural convection barely moves enough air to matter. It helps a little. It rarely solves the problem alone, especially once you've got more than one heat-generating box in the same enclosed space.
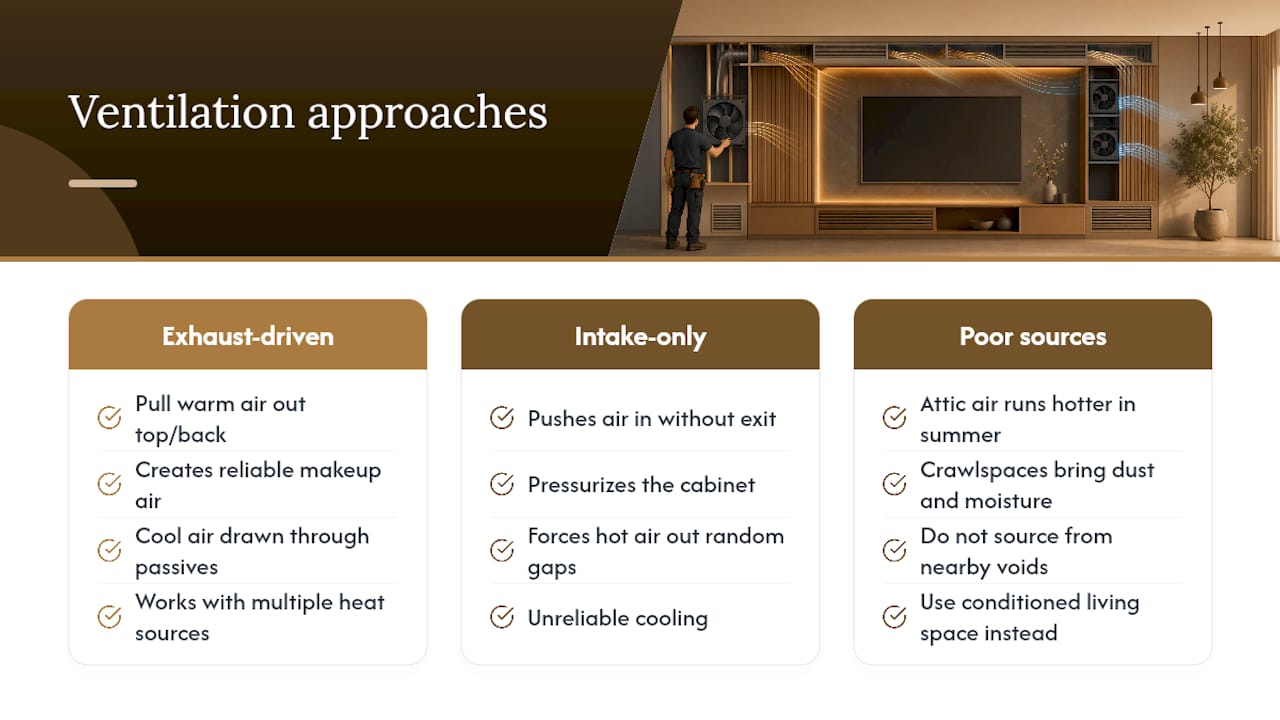
What actually works is giving the air somewhere predictable to go. Exhaust-driven setups create reliable makeup air: pull warm air out the top or back, and cooler air gets drawn in through passive openings elsewhere without you having to force it. Intake-only setups, by contrast, are unreliable, because pushing air in without a clear exit just pressurizes the box and pushes hot air out wherever it finds a gap, which is rarely where you want it.
Short-circuiting is the failure mode nobody talks about until it bites them: exhaust air gets pulled right back in through a nearby intake, so the fan is just recycling the same hot air in a loop instead of clearing it out. You'll spot it when a cabinet stays warm even with a fan running constantly. The fix is physical separation. Put the intake and exhaust on opposite sides or opposite ends of the enclosure, not six inches apart on the same panel.
One more trap: pulling makeup air from an attic or crawlspace sounds clever because that space is "unused," but attics run hotter than the room in summer and crawlspaces bring dust, insulation fibers, and moisture straight into your electronics. A well-designed AV cabinet needs an intentional intake and exhaust path sourced from conditioned living space, not from whatever void happens to be nearby.
Passive vs Active Cooling: Matching the Fix to the Heat Load
Passive ventilation, vents and grilles with no moving parts, works fine for light loads: a single streaming box, a soundbar, maybe a modest AV receiver with decent clearance around it. If the cabinet has an inch or two of breathing room per component and nothing runs hot to the touch, you probably don't need a fan.
The signs passive cooling is failing are usually obvious once you know what to look for. A receiver's case feels noticeably warm on top. Console fans spin up louder than they do in open air. Devices intermittently shut down or drop connections during long sessions, that's often thermal protection kicking in, not a hardware fault.
When you hit that point, you've got a few active options. Quiet cabinet fan kits handle most home setups. Temperature-controlled fan systems are the better choice for living rooms because they only run when a probe detects rising heat, instead of humming constantly in the background. Inline duct fans work well when you need to move air through a longer or bent path, like behind a media wall with hidden routing. For genuinely heavy loads, stacked amplifiers, a home server, multiple receivers, dedicated small air conditioning units may be the only practical answer despite the added cost and energy draw.
The trade-offs are predictable: more airflow capacity generally means more noise, more installation complexity, and a higher price tag. Match the tool to the actual heat load, not to what looks impressive on a spec sheet.
Fan Placement That Actually Moves Heat
Where you put the fan matters more than which fan you buy. The most reliable layout pairs a top exhaust fan with a lower intake, which works with natural convection instead of against it, since hot air already wants to rise toward that top exhaust point.
If you're only installing one fan, configure it as exhaust and let passive openings handle the intake elsewhere in the cabinet. A single intake fan without a matching exhaust just pressurizes the box.
For multi-shelf cabinets or full media wall installations, zoned setups make sense: one exhaust fan for the top shelf's electronics, a separate passive or active path for gear lower down. Trying to cool a five-foot-tall cabinet with a single fan almost always leaves one zone starved of airflow.
A few placement details that separate a working system from a frustrating one:
- Mount temperature probes near the hottest component, not near the fan itself. A probe sitting in the fan's direct airflow reads artificially cool air and won't trigger the fan when it actually needs to run.
- Keep fans from blasting directly onto a component's vents. Aim for general airflow across the shelf, not a focused jet on one box.
- Angle intake openings away from dusty air paths (near carpet, near a floor vent) to cut down on how often you're cleaning fan blades and filters.
- Leave at least a small gap between the fan housing and any cabinet wall so it isn't drawing from its own exhaust.
Pro Tip: Tape a cheap wireless temperature sensor inside the cabinet for a week before you commit to fan placement. You'll learn exactly which shelf runs hottest and when, instead of guessing.
Keeping Cooling Fans Quiet Enough for a Living Room
Noise is usually the deciding factor in whether a homeowner actually uses their ventilation setup or disconnects it after a week. Bigger, slower-spinning fans move the same air as small, fast ones while producing far less audible whine, which is why temperature-controlled systems with variable speed and low noise levels ranging from a whisper to moderate quiet fan noise levels tend to disappear into the background of a normal room.
A few concrete moves cut noise and vibration without sacrificing airflow:
- Choose fans rated for lower dBA at your required CFM rather than the loudest, most powerful option available.
- Mount fans on rubber grommets or isolation pads so vibration doesn't transfer into cabinet panels and turn into a low hum through the furniture itself.
- Use thermostatic control so the fan only runs during actual heat spikes, not continuously, which cuts total noise exposure over the course of a day.
- Size grilles generously rather than using small, tight openings; a cramped vent creates turbulence noise as air is forced through, while a wider grille lets air pass quietly.
- Point vent openings away from seating areas when the cabinet layout allows it, so any residual fan noise isn't aimed straight at the couch.
Larger, slower fans paired with thermostatic control consistently deliver the best balance of airflow and quiet in home installations, according to fan manufacturers who specialize in this exact use case.
Plan Ventilation Before You Finish the Cabinet
Retrofitting a vent into finished millwork is expensive and it usually looks like an afterthought, because it is one. The right sequence starts with an equipment list: write down every device going into the cabinet along with its approximate wattage and typical runtime, since component heat output and usage patterns determine whether passive airflow will be enough or whether you need to design in fan capacity from day one.
Clearance matters more than most people budget for. Give each shelf at least an inch or two of vertical space above the tallest component, and leave a few inches of depth behind gear for cables and airflow rather than pushing everything flush against the back panel.
Build the actual vent openings into the design itself rather than treating them as a patch. Toe-kick vents at the base, a reveal along one side, or a removable rear panel all let air move without breaking the cabinet's clean look. Sequencing vents, wiring, and access panels into the cabinetry drawings before construction avoids the drywall-saw fix later.
Don't forget service access. If you can't reach the back of the cabinet to swap a receiver or check a fan without unscrewing half the unit, you'll skip maintenance until something fails. Plan a removable panel or a hinged section specifically for that purpose, and route power and low-voltage cabling so a technician (or you, six months from now) can trace a wire without pulling everything apart.
What to Actually Look for in Fans, Vents, and Kits
Specs matter here, but only the right ones. CFM (cubic feet per minute) tells you volume moved, but factory CFM numbers assume ideal, unobstructed conditions that a cabinet never provides. A practical rule many suppliers recommend is multiplying your cabinet's cubic footage by three to land on a realistic CFM target that accounts for real-world resistance and airflow loss.
Static pressure rating matters almost as much as CFM, since a fan pushing air through a tight cabinet with baffles and cables in the way needs to overcome resistance that an open-air spec sheet doesn't capture. Look for fans that list performance at actual static pressure, not just free-air numbers.
When comparing options, run through this checklist:
- CFM relative to cabinet volume, using the volume times three approach as a starting baseline.
- dBA rating at the speed you'll actually run, not just the fan's maximum-speed noise figure.
- Thermostatic control with an external probe, so the system reacts to actual heat rather than running on a fixed timer.
- Fan diameter and depth, since larger fans move more air at lower RPM (and lower noise) than small ones straining to keep up.
- Filterability and access, meaning you can pull a filter or wipe a fan blade without disassembling the cabinet.
- Exhaust-only versus intake-plus-exhaust kits: exhaust-only setups with passive makeup air are often the more predictable choice for most home installations, since they avoid the pressure conflicts that come with forcing both directions mechanically.
A cabinet holding two average AV components in roughly 4 cubic feet of enclosed space lands around a 12 CFM target using the times three formula. That's a modest, quiet fan, not an industrial blower. Oversizing "just to be safe" usually just buys you unnecessary noise.
Installation Mistakes That Force You to Redo Everything
Most ventilation regrets trace back to a handful of avoidable errors. Fix these during installation and you'll skip the after-the-fact scramble entirely.
- Cut vent openings and route ducting before final finish. Trying to add a hole after paint and trim means visible patch marks and rushed cuts.
- Never draw makeup air from an attic or crawlspace. Both introduce heat, dust, or moisture that shortens component life faster than the overheating you're trying to fix.
- Test before you seal anything. Run the system for a few hours, check component temperatures by hand or with a probe, and confirm the fan's noise level is acceptable at normal room volume before the cabinet is fully closed up.
- Calibrate the probe placement. If the fan never seems to trigger, or triggers constantly, the probe is likely in the wrong spot relative to the heat source.
- Call in an AV or HVAC professional for complex runs. Long duct paths, multi-zone cabinets, or anything routed through structural framing is worth a second set of eyes before you commit.
Keeping the System Working Long After Install
A ventilation setup isn't a one-time install and forget. Dust builds up on fan blades and inside vent grilles over months, and a dust-caked fan moves noticeably less air while running louder than a clean one.
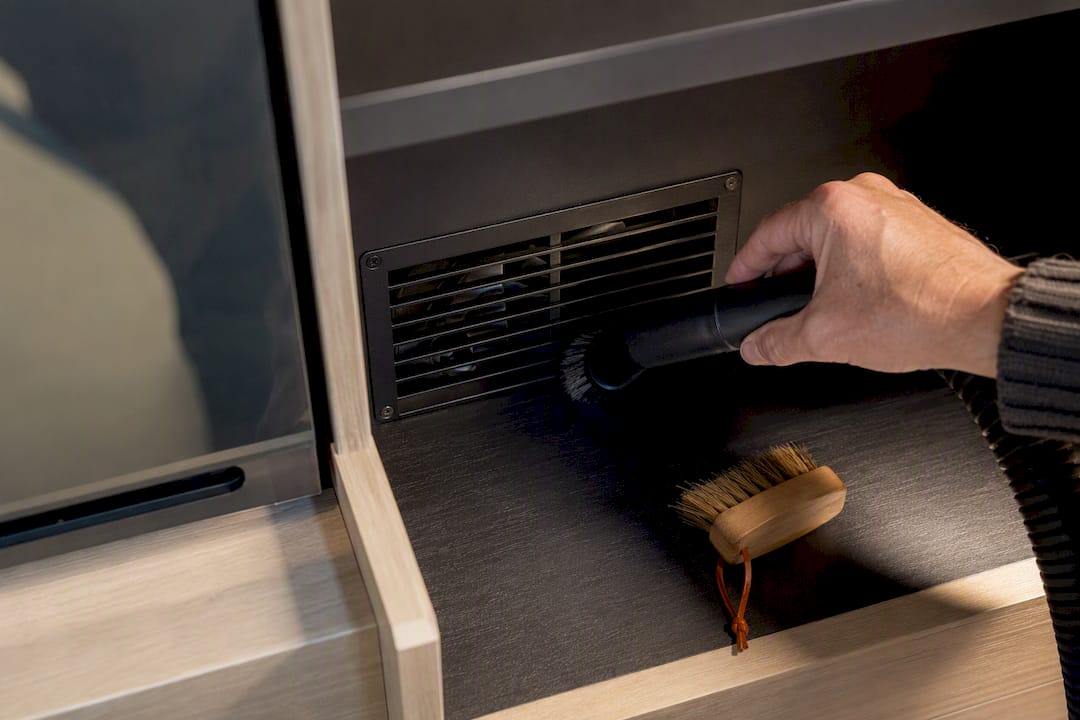
Check fans and filters every few months: wipe blades, vacuum grilles, and replace any filter media if your kit uses one. A simple wireless temperature sensor left inside the cabinet gives you an early warning if temps start creeping up before a component actually fails. Listen for changes in fan sound too. Grinding, rattling, or a sudden increase in pitch usually means a bearing is wearing out, and it's cheaper to replace a $20 fan now than to explain a fried receiver later. Adjust your thermostatic setpoint seasonally, since a cabinet that's fine in winter can run warmer once summer room temperatures climb, and revisit it any time you add new gear to the shelf.
Practical Design Notes
Ventilation is one of those details that separates a media wall that looks great on install day from one that still looks great two years later with gear running cool inside it. Every pre-cut kit is designed to account for access and airflow before the panels ship, because sealing AV gear behind a beautiful floating cabinet does nothing for you if the receiver inside is overheating within a season.
The most common design solution is a hidden toe-kick vent along the base of the unit, paired with a removable rear panel that gives you both a passive intake path and real service access without breaking the clean lines of the wall. For customers stacking heavier gear, cable boxes, gaming consoles, and a receiver on the same shelf, the recommended clearance is generous enough to let a small temperature-controlled fan sit unnoticed behind the media wall's slat paneling.
Homeowners planning a build should treat the ventilation question the same way they treat cable routing: decide it before the panels are cut, not after. Anyone browsing DIY media wall kits can build that airflow planning into the layout from the start, and the accessories catalog includes vent trims and add-ons designed to fit the same clean aesthetic as the rest of the wall.
The Case for Planning Ventilation Like a System, Not an Afterthought
Most homeowners treat cooling as a problem to solve after something already feels warm. That's backward, and it's the single biggest reason DIY media walls end up with a hole cut into finished paneling six months after install. Heat load should be part of the same conversation as cable routing and shelf spacing, decided at the design stage, not discovered later with a hand pressed against a warm receiver.
The industry's obsession with CFM numbers also misses the point for most home setups. A homeowner cooling two or three components in a media wall cabinet doesn't need server-room airflow. They need a predictable path for air to enter and leave, and a fan that only wakes up when it's actually necessary. Chasing bigger CFM ratings when a modest, quiet exhaust fan would do the job just trades a heat problem for a noise problem, and noise is the complaint that actually gets systems disconnected within a year.
The overlooked variable in almost every ventilation guide is probe placement. A perfectly sized fan controlled by a badly placed sensor is functionally the same as no thermostat at all, since it either runs constantly or never triggers when it should. Get the sensor right, and a modest fan outperforms an oversized one that's reacting to the wrong data.
— Jake
Sources
- How to Design a Quiet AV System With Hidden Ventilation — AVI Group
- Cabinet Venting — Cool Components
- AVP-480X - Quiet Temperature-Controlled Cabinet Fan System – Procool
- Cabinet cooling and ventilation — AC Infinity
- Keep it cool: three rack ventilation methods — ProSoundWeb
FAQ
What Are the Basic Components of a Ventilation System?
A functional AV ventilation setup needs an intake path for cool air, an exhaust path for warm air, and something to move that air when passive convection isn't enough, typically a fan and, for larger loads, a thermostatic controller and temperature probe.
What Are the Four Main Types of Ventilation?
For AV cabinetry, the practical categories are passive (vents and grilles with no moving parts), active exhaust (a fan pulling warm air out), active intake plus exhaust (paired fans creating directed airflow), and dedicated air conditioning for large or centralized equipment loads.
Do Cooling Fans Actually Work for AV Cabinets?
Yes, when placed correctly. Exhaust-configured fans paired with passive intake openings reliably lower cabinet temperatures, while poorly placed fans or intake-only setups often underperform or short-circuit.
What Are the Essential Types of Ventilation Systems for Home AV Setups?
The systems homeowners actually use are passive grilles and vents, quiet clip-on fans for light loads, temperature-controlled cabinet fan kits, inline duct fans for longer or hidden air paths, and small dedicated AC units for heavy, centralized equipment racks.
How Do I Know if My AV Cabinet Needs Active Cooling?
Warm-to-the-touch component cases, audibly spinning-up internal fans, or intermittent shutdowns during extended use all signal that passive ventilation alone isn't handling the heat load, and it's time to add a fan or reconsider the layout.