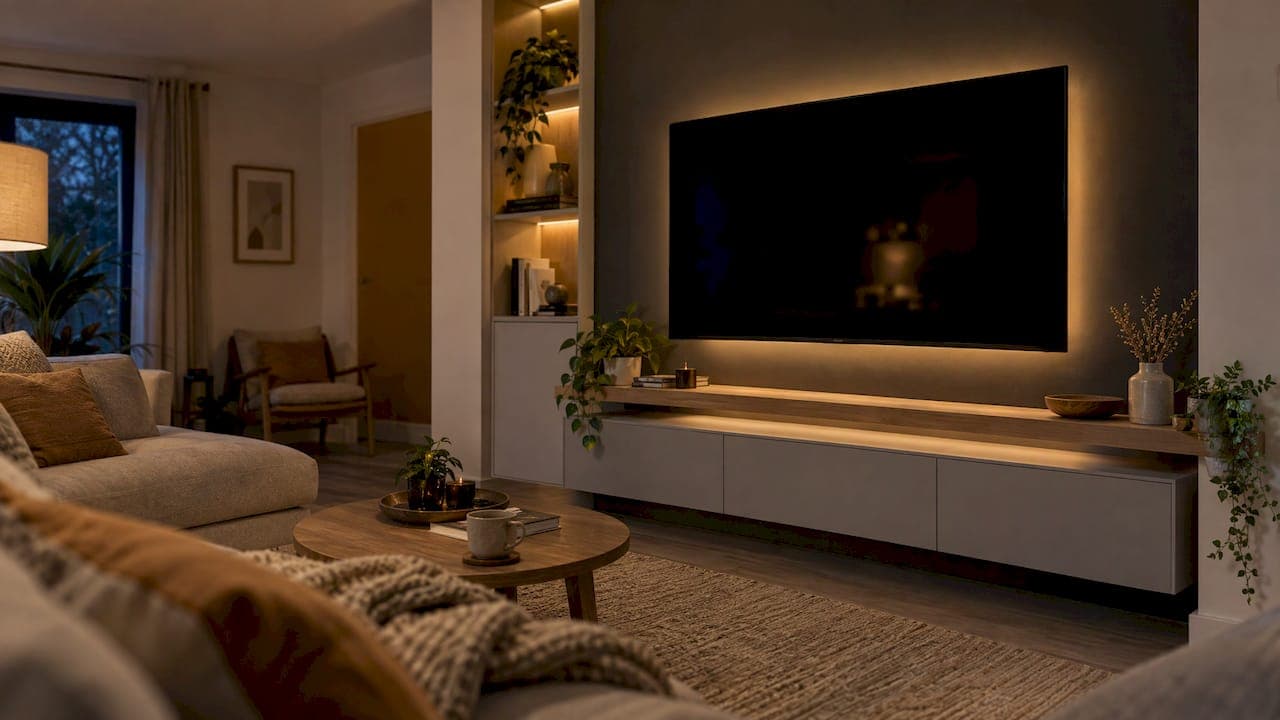
A dimmable LED TV wall is a TV wall with built-in LED lighting you can turn down, from a soft glow behind the screen to light under floating cabinets or inside shelves. It works when the strip, the driver and the dimmer are matched, the light is hidden, and you can reach the driver later. This guide covers the setups, the compatibility checks, glare and heat, and where an electrician comes in.
TL;DR
- Pick the lighting zones first: behind the TV, under floating cabinets, inside shelves, or along slat panels. Each needs its own strip and, ideally, its own dimming control.
- Match voltage across the whole chain. If the tape is 24V, the driver and the control must be 24V too.
- Dry-fit the strip and check it from your sofa before anything is fixed, and decide where the driver lives before panels are cut.
- Line-voltage work, such as a new receptacle, a switch or dimmer box, or a hardwired driver, belongs to a licensed electrician.
- Low-voltage plug-in setups are the simplest DIY route, and a kit with pre-cut panels makes hiding the wiring much easier.
Table of Contents
- What a dimmable LED TV wall actually is
- Five lighting setups homeowners can build
- Choosing the type of TV backlight
- Brightness and color temperature: how to set the mood
- Compatibility: strips, drivers, dimmers and smart controls
- Installing it safely, and when to call an electrician
- Avoiding glare, dots, heat and uneven light
- What a DIY dimmable LED TV wall costs
- Our perspective
- Get the lighting planned into your wall
- FAQ
- Sources
What a dimmable LED TV wall actually is
The phrase gets used for two different things, so it helps to separate them.
The first is a TV wall with dimmable lighting: a feature wall with the TV mounted on it and LED strips tucked into the joinery. A backlit TV and media wall hides the strip behind the screen and the surrounding panels, so the wall glows softly and you never see the light source from the sofa, as LED Club's build guide describes it.
The second is an LED video wall, the tiled commercial displays used for stages and advertising. Those are a different product for a different job. This article is about the first kind: the lighting that makes a home media wall look finished and lets you set the mood for movie night or a bright afternoon.
Five lighting setups homeowners can build
Most home media walls combine two or three of these. A guide to LED strips for media walls lists the common placements:
- Soft backlight behind the TV. The classic. It lifts the wall off the screen edges and softens the contrast between a bright picture and a dark room.
- Under floating cabinets or shelves. A thin strip under a floating TV cabinet makes the unit appear to hover and washes the wall below it.
- Inside shelving. Strips along shelf edges or in niches highlight books, art and decor.
- Ceiling or cove lighting. A recess above the wall washes light down the surface.
- Vertical accents in slat or textured panels. Light between slats adds depth and shows off the texture.
If you like the under-cabinet idea, this overview of under-cabinet lighting types is useful for thinking about where concealed light sits and how it falls on a surface, and the same logic carries over to floating TV units and shelves.
Our own media wall lighting ideas article walks through how these zones look in finished walls.
Choosing the type of TV backlight
Not every backlight is the same, and the differences affect both cost and how fiddly the install is.
| Type | How it works | Best for |
|---|---|---|
| Simple dimmable strip | A single-color or white strip on a dimmer or remote | Calm, plain ambient light |
| Screen-synchronized backlight | A strip around the TV's rear edge plus a camera, HDMI box or app that copies on-screen colors | Movies and gaming, a more immersive look |
| Plug-in USB strip | Powered from the TV's USB port, so it comes on with the TV | Quick, low-effort setups |
| Built-in fixture | Lighting in a shelf, cabinet or fireplace unit | A clean look with no strip to hide |
A TV backlighting kit generally pairs an LED strip on the rear perimeter with a controller that reads the content and sets the color, according to Wirecutter. That is a different animal from architectural lighting built into the wall, and many homeowners use both: a sync strip on the TV and dimmable warm lighting in the joinery.
If you would rather skip strip-hiding altogether, a fixture with the light built in does the work for you. The Oslo Lux LED floating shelf has lighting integrated, and the Avalon 80" floating TV cabinet with RGB LED fireplace combines cabinetry with color lighting in one unit.
Brightness and color temperature: how to set the mood
The goal of lighting behind a screen is to reduce the jump between a bright picture and a dark room. Bias lighting is widely described as easing that contrast, as this lighting guide notes. So the practical rule is simple: the backlight should be dimmer than the picture, never competing with it.
Some habits that work well in a real living room:
- Start low and raise it. Set the dimmer to its lowest level in a dark room, then lift it until the wall just glows. If you notice the light before the picture, it is too high.
- Keep one color temperature per wall. Mixing a warm shelf strip with a cool backlight looks accidental. Choose one white tone for the whole wall, then use an RGB or tunable strip only where you want a deliberate accent.
- Use a neutral white behind the TV if you care about picture accuracy. Strong colors on the wall can shift how the screen looks. Sync strips are the exception, since they are meant to add color.
- Dim in layers. Put backlight, shelf light and cabinet light on separate channels so you can run the TV zone low and the shelves a little higher.
It is worth knowing that dimming itself can change color. Dimming performance varies between products and dimming can shift chromaticity, according to a U.S. Department of Energy presentation on phase-cut dimming. In practice, that is a reason to buy all the strips for one wall from the same product line and test them together before gluing anything down.
Compatibility: strips, drivers, dimmers and smart controls
This is where most DIY lighting projects go wrong. LEDs are not like old bulbs, and the parts must be matched.
Voltage first. If the tape is 24V, the driver and the control must also be 24V, as ULTRA LEDs explains. Mixing a 12V controller with 24V tape is the classic mistake.
Then the dimming method. Low-voltage strips are commonly dimmed by a controller or dimmer that sits between the driver and the strip. Mains-side dimming, where a wall dimmer cuts the power to the driver, is a different approach, and it only works if the driver is designed for it. The DOE presentation above points out that LEDs are nonlinear loads, so a dimmer and driver that are not designed to work together can flicker, buzz or fail to dim smoothly.
Then the wattage. Add up the strip lengths, check the watts per foot on the spec sheet, and pick a driver with headroom above the total. Our guide to safe media wall lighting circuits and driver sizing shows how to do the math and sketch the wiring.
Then the smart layer. If you want app or voice control, choose a controller that supports your platform and your strip type, and confirm that it can handle the strip's voltage and total load. Keep one controller per zone if you want separate dimming.
A short pre-purchase checklist:
- Strip voltage and watts per foot
- Driver voltage and total wattage, with spare capacity
- Dimmer or controller rated for that voltage and load
- Whether the driver is meant for the dimming method you plan to use
- Connector type and wire gauge for each run
Our Lighting accessories page collects media wall lighting in one place, which helps keep parts consistent.
Installing it safely, and when to call an electrician
The order of work matters more than the speed.
- Plan the zones and the driver location. The driver must remain reachable once the panels are up, so settle where it goes before panels are cut, per LED Club.
- Dry-fit the strip. Tape it temporarily, turn it on, and check it from the sofa before mounting anything permanently. This is how you catch a hot line or an uneven wash.
- Run and hide the wiring. Plan cable paths before closing the wall. Our guide to hiding TV wires safely covers it.
- Mount, connect, test. Fix the strips or channels, connect the driver and control, and test each zone before the final panels go on.
Where an electrician comes in. Low-voltage strips plugged into a reachable outlet are a normal DIY job. Line-voltage work is not: installing a receptacle, a switch or dimmer box, or a hardwired driver should be done by a licensed electrician, as the LED Club guide advises. Also call one if you are unsure about local code or permit rules, since requirements differ by city and state.
Avoiding glare, dots, heat and uneven light
Bad lighting is usually visible within the first minute, and almost always avoidable.
Visible dots. Individual LED points show up when the strip is too sparse, sits too close to a surface, or has no diffuser. Dot visibility depends on strip density, profile depth and diffuser type, and an aluminum channel can help dissipate heat and cut dots, per LED Club. Deeper channels with frosted diffusers hide more.

Hotspots and uneven shadows. Behind the TV, keep the strip on a straight plane facing the wall and bridge irregular contours of the set rather than tracing every bump, MediaLight advises. The same source reports workable installations from about 0.75 inches to 10 feet from the wall, with strip density and output chosen to suit the distance. A thin wall-mounted TV close to the surface needs a different strip than a set that floats several inches out.
Glare. Point light away from the screen, not toward it. Light that bounces off a glossy panel into your eyes is the reason to test at night from your real seat.
Heat. Strips that run hot are crowded, undersized or poorly ventilated. Use a channel, avoid sealing a strip against foam or fabric, and keep the driver where air can move around it.
Uneven color. Avoid very long single runs on one feed. If the far end looks dimmer or warmer, split the run or power it from both ends.
What a DIY dimmable LED TV wall costs
There is no honest single number, because the total depends on a few choices more than on the lighting itself. The things that move the price most:
- How many zones you light. A single backlight is a small purchase; backlight plus shelves, cabinet underlighting and slats multiplies strips, drivers and controllers.
- Built-in or added-on lighting. A fixture with LEDs inside costs more per piece than a bare strip, but it saves channels, drivers and fiddly mounting.
- Smart control. App, voice or screen-sync controllers cost more than a simple dimmer.
- Electrical work. If you need a new receptacle, dimmer box or hardwired driver, add a licensed electrician's time.
- The wall itself. Panels, cabinets, finishes and the TV mount usually outweigh the lighting in a full build.
Because our kits ship pre-cut and pre-labeled, you can plan the lighting channels and driver position before you assemble. For custom planning, we offer design packages: Single Concept Design at $99, the 3 Concepts + Revision Design Package at $199, and Full Design & Quote at $299, all one-off fees.
Our perspective
We build media walls around a simple idea: the lighting should be planned with the wall, not bolted on afterward. Almost every lighting problem we hear about, from a visible dotted line to a driver nobody can reach, comes from deciding the wall first and the lighting last.
That is why we like a modular, pre-engineered approach. When panels are pre-cut and pre-labeled, you know where the cabinets, slats and TV sit before you glue a single strip, so you can leave a clean channel for the LEDs and a proper spot for the driver. Hidden wire management is part of the system, not an afterthought.
Our advice is to pick one white tone, light two or three zones rather than every surface, and put each zone on its own dimming control. The wall then works for movie night, a bright afternoon and everything between. If you want it to look custom without paying for a custom build, that is exactly what our kits are designed to do.
Jake
Get the lighting planned into your wall
If you would like the lighting, cabinetry and TV placement settled before you start, our design packages and kits are the place to begin.
Browse media wall lighting to match strips and fixtures, or see how it works for DIY kits and our custom install option. In the SF Bay Area, we also offer white-glove installation.
FAQ
Can I put a dimmable LED backlight behind any TV?
Yes, in most cases. A strip on the back perimeter of the set works with any TV, and the choice is mainly between a simple dimmable strip and a sync kit with a camera, HDMI box or app, as Wirecutter describes. Check the clearance between the TV and the wall, since strip output and density should suit that distance.
Do I need an electrician for LED lighting on a media wall?
Not for low-voltage strips powered from a reachable plug-in driver. You do need a licensed electrician for line-voltage work, such as installing a receptacle, a switch or dimmer box, or a hardwired driver. When in doubt, ask one before you close the wall.
Why does my LED strip flicker when I dim it?
The usual cause is a mismatch between the dimmer, the driver and the strip. LEDs are nonlinear loads and dimming performance varies between products, according to the Department of Energy material. Confirm voltage, load and dimming method are compatible, and test the parts together before mounting.
Should the backlight be warm or cool?
Pick one tone for the wall and keep it consistent. For a calm living room, a warmer white feels cozy; for picture-focused viewing, many people prefer a neutral white behind the screen. Set the level low enough that the picture stays the brightest thing in the room.
Sources
- Building a Backlit TV and Media Wall, LED Club
- LED Strip Lights for Media Walls: Complete Guide
- Wirecutter: TV backlighting
- Media Wall Lighting Guide
- Choosing LEDs for a Media Wall Installation, ULTRA LEDs
- Steps for Successful Phase-Cut Dimming of LEDs, U.S. Department of Energy
- MediaLight Bias Lighting FAQ
- Under cabinet lighting types