
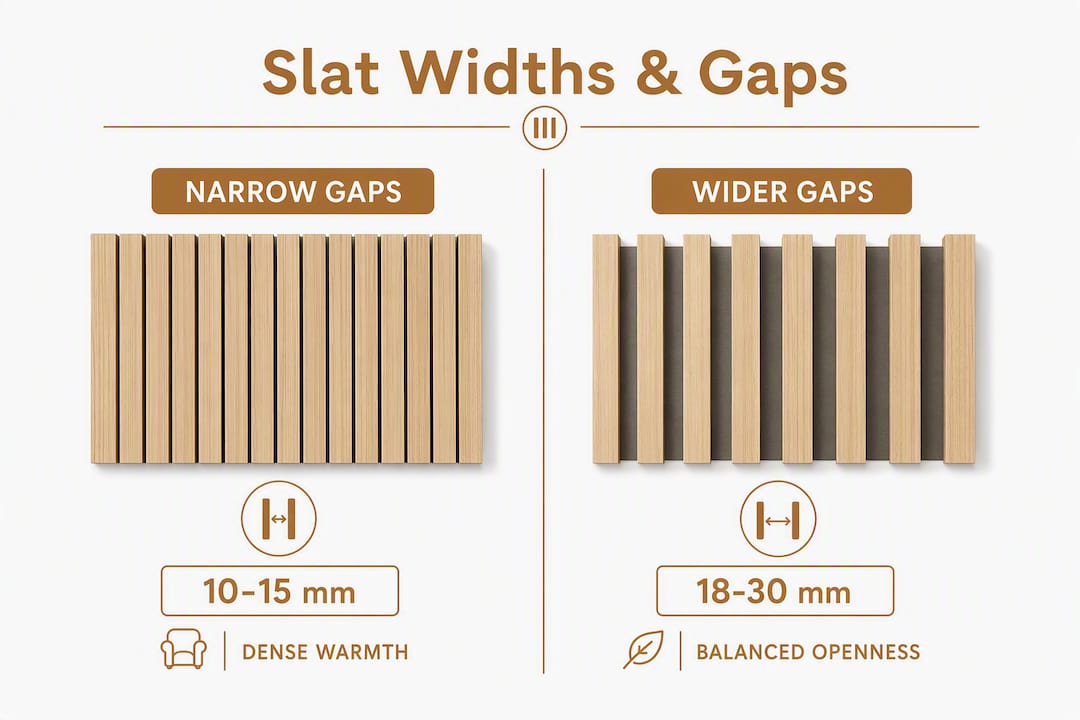
For a balanced residential look, use gaps of 18 mm (about 11/16") between slats for most decorative wood slat walls. For a denser, more solid feel, use 10–15 mm gaps. For a more open look or when integrating LED channels, opt for 25–30 mm gaps. The one rule that holds across all three ranges: keep the gap smaller than the slat width so wood reads stronger than void.
Retail slatwall follows a completely different standard. Commercial panels use a three-inch on-center (OC) spacing, measured from groove center to groove center, which maximizes accessory compatibility. That figure is not the same as a decorative gap measurement. A 3" OC panel might have a visible gap of only 1–1.5 inches depending on slat thickness. Keep that distinction in mind when you read product specs.
Two tools worth bookmarking before you start: the BoardCalculate Slats Calculator for automated gap-and-count math, and Themediawallstore's pre-cut acoustic slat wall panels if you want spacing presets built in.
- Narrow gaps (10–15 mm): dense, warm, wood-forward look; higher material cost
- Typical gap (≈18 mm): balanced; roughly 15 slats per meter with 48 mm wide slats
- Wide gaps (25–30 mm): open, airy; fewer slats, easier LED routing, lower material cost
Table of Contents
- Why does slat wall spacing change how a room looks and sounds?
- What slat widths and gap sizes should you use?
- How do you calculate the number of slats or gap size for your wall?
- How do you keep gaps even throughout the whole installation?
- How does spacing affect acoustics, LED lighting, and hardware placement?
- When do pre-cut DIY slat wall kits make sense?
- Key Takeaways
- The detail most DIYers get wrong
- Pre-cut slat wall kits that skip the layout math
- Useful sources
- FAQ
Why does slat wall spacing change how a room looks and sounds?
Spacing is not just an aesthetic call. It controls three things at once: visual density, acoustic behavior, and functional access behind the wall.
Visual density is the most obvious. Tight gaps make the wall feel solid and warm, almost like a wood-clad surface. Wider gaps read as a graphic pattern, letting the wall behind show through. Neither is wrong, but they suit different rooms. A home theater or bedroom usually benefits from the denser look; a living room accent wall often looks better with more breathing room.
Acoustic behavior is where spacing gets interesting. Tighter slat spacing increases the total reflective surface area of the panel. When you back that panel with acoustic felt or mineral wool, the felt contacts more of the backing wall and absorbs more mid-frequency sound. Wider gaps let more sound pass through to the backing material directly, which can actually improve high-frequency absorption. The practical takeaway: if you are building for acoustic control, the backing material matters as much as the gap size. Felt-backed acoustic wall panels work best when the gap is in the 12–20 mm range.

Functional constraints include mounting, lighting, and cable routing. Narrow gaps make it harder to route LED strips or run cables behind the wall without pre-planning. Wider gaps give you more room to work but may expose wiring from certain viewing angles.
Orientation adds another layer. Vertical slats draw the eye upward and make ceilings feel higher. Horizontal slats widen a space visually but require blocking aligned with studs every 16–24 inches to prevent flexing. Diagonal layouts are striking but demand more precise backing prep and more waste in cuts. For most DIY decorative wall treatments, vertical is the most forgiving starting point.
Retail slatwall and decorative residential walls have different goals entirely. Retail systems prioritize accessory compatibility at 3" OC; residential walls prioritize visual density and acoustic behavior. Plan for the look first, then do the math.
What slat widths and gap sizes should you use?
The table below pairs common slat widths with gap ranges and their visual effects. Use it as a starting reference, then adjust based on your wall dimensions and the formula in the next section.
| Slat Width | Narrow Gap (10–15 mm / 3/8"–9/16") | Typical Gap (18 mm / 11/16") | Wide Gap (25–30 mm / 1"–1 3/16") |
|---|---|---|---|
| 25 mm (1") | Very dense; almost solid | Balanced, graphic | Open; gap nearly equals slat |
| 40 mm (1 9/16") | Dense, warm | Classic residential look | Airy, modern |
| 48 mm (1 7/8") | Rich, solid feel | ~15 slats/meter | Open; good for LED channels |
| 50 mm (2") | Solid; fewer gaps visible | Slightly open | Very open; light passes through |
According to worked examples, a 240 cm wall with 48 mm slats yields approximately 17 slats per meter at a 12 mm gap, 15 slats per meter at 18 mm, and 13 slats per meter at 28 mm. That difference in slat count directly affects your material budget.
Quick mm-to-inches conversion reference:
| mm | Inches (approx.) |
|---|---|
| 10 mm | 3/8" |
| 12 mm | 15/32" |
| 15 mm | 9/16" |
| 18 mm | 11/16" |
| 20 mm | 25/32" |
| 25 mm | 1" |
| 30 mm | 1 3/16" |
The 18 mm default holds up well for most rooms. Go narrower when you want a luxurious, wood-heavy look or when the slats are thin (under 40 mm wide). Go wider when you are integrating LED strips, want to reduce material cost, or are working with slats 50 mm and above where a narrow gap would look cramped.
Pro Tip: Order 10% extra slats when using narrow gaps. The higher slat count per meter means small measurement errors or damaged pieces leave you short at the worst moment.
How do you calculate the number of slats or gap size for your wall?
The core formula is straightforward:
Rearranged to solve for the number of slats (N) or the gap size:
- Solve for N: N = (TotalWidth + Gap) ÷ (SlatWidth + Gap)
- Solve for Gap: Gap = (TotalWidth − (N × SlatWidth)) ÷ (N − 1)
Worked example in metric
Wall width: 2,400 mm. Slat width: 48 mm. Target gap: 18 mm.
- Plug into the N formula: N = (2,400 + 18) ÷ (48 + 18) = 2,418 ÷ 66 = 36.6
- Round down to 36 slats.
- Back-calculate the actual gap: Gap = (2,400 − (36 × 48)) ÷ (36 − 1) = (2,400 − 1,728) ÷ 35 = 672 ÷ 35 = 19.2 mm
- That 1.2 mm difference is within the ±1–2 mm tolerance. Distribute it evenly, or absorb it into the perimeter trim on each side.
Worked example in inches
Wall width: 94.5 inches. Slat width: 1 7/8 inches (1.875"). Target gap: 11/16 inch (0.6875").
- N = (94.5 + 0.6875) ÷ (1.875 + 0.6875) = 95.1875 ÷ 2.5625 = 37.1
- Round down to 37 slats.
- Back-calculate gap: Gap = (94.5 − (37 × 1.875)) ÷ (37 − 1) = (94.5 − 69.375) ÷ 36 = 25.125 ÷ 36 = 0.698 inches (≈45/64")
- The 1/32" difference is invisible to the eye. Split it between the two edge trim pieces.
Practical rules to follow:
- Always build a 1–2 foot test strip before committing to the full wall. Spacing that looks right on paper can feel too tight or too open in the room's actual light.
- A rounding tolerance of ±1–2 mm (or 1/32") is acceptable. Distribute any remainder into the perimeter trim, not into random gaps mid-wall.
- Use the BoardCalculate Slats Calculator to run multiple gap scenarios quickly before cutting anything.
For decorative wall strips with non-standard profiles, measure the actual slat width at three points along its length. Milled lumber varies, and a 0.5 mm width difference across 36 slats adds up to 18 mm of cumulative error.
How do you keep gaps even throughout the whole installation?
Consistent spacing across a full wall comes down to preparation and the right physical tools, not just careful measuring.
Pre-installation checklist
- Check and plumb the backing. Furring strips or a plywood substrate must be flat and plumb before the first slat goes up. A bowed backing wall makes every gap look uneven regardless of how carefully you space the slats.
- Transfer layout marks. Mark slat centerlines on the backing using a story pole (a straight stick with all gap and slat positions marked at full scale). This takes 20 minutes and eliminates cumulative measuring error.
- Pre-cut end trim. Cut all edge pieces and L-channels before installation starts. Trying to fit trim around installed slats is harder and produces worse results.
- Build a test strip. Attach 4–5 slats on a scrap board with your chosen gap. Live with it in the room for a day under normal lighting before committing.
Step-by-step installation
- Attach furring strips or strapping horizontally across the wall, every 16–24 inches, fastened into studs. Check level at each strip.
- Run the first slat at the top or bottom reference line. Use a spirit level; this slat sets the angle for every slat that follows.
- Cut spacer blocks from scrap wood at exactly your target gap dimension. Use two per slat, one near each end.
- Drop the next slat onto the spacer blocks, check level, then fasten with brad nails, pin nails, or screws through the back into furring.
- Check level every 16–24 inches of run. A single out-of-level slat compounds across subsequent rows.
- Finish open edges with matched end pieces or aluminum L-channels. Clip or adhere them to the slat profile to hide felt or substrate edges.
Tools you need:
- Spirit level (48" preferred for long runs)
- Tape measure and marking pencil
- Pre-cut spacer blocks (one set per gap size)
- Story pole for layout transfer
- Brad gun or pin gun, or screws with a countersink bit
- Clamps for adhesive-set applications
- Jigsaw or miter saw for end cuts
- Small framing square for corner checks
Pro Tip: Make a story pole from a straight 1x2 by marking every slat position and gap at full scale. Hold it against the wall and transfer marks in seconds. On a 10-foot run, this beats measuring each gap individually and prevents the 3–4 mm cumulative drift that shows up as a visible tilt by the time you reach the far edge.
How does spacing affect acoustics, LED lighting, and hardware placement?

Acoustic performance
Tighter gaps (10–15 mm) increase the reflective surface area of the slat face, which means more sound bounces back into the room. That is not always bad — some reflection keeps a room from sounding dead. When you back the panel with acoustic felt or mineral wool, the felt covers more of the wall surface at tighter spacings, improving mid-frequency absorption. For a home theater or music room, pair a 12–18 mm gap with a quality acoustic backing for the best balance of aesthetics and performance.
Wider gaps (25–30 mm) let more sound reach the backing directly, which can improve high-frequency absorption but reduces the visual density of the panel. If pure acoustic performance is the goal, the backing material choice matters more than the gap size alone.
LED strip routing
LED strips need a minimum channel depth and width to sit flush or recessed. Most standard LED strips are 10–12 mm wide and 3–4 mm tall. A gap of 18 mm gives you just enough room to route a strip behind the slat face, but it will be visible from sharp angles. At 25 mm or wider, you can recess the strip deeper and add a diffuser without the light source showing. Plan the LED channel location before cutting any slats, and route wiring through the backing before the first slat goes up.
Mounting and hardware blocking
TV mounts, shelf brackets, and outlet boxes need solid backing. Slat spacing determines where you can fasten hardware without cutting through a slat. Before installation, mark blocking locations on the backing wall and add solid lumber or plywood patches at those points. A 16 mm gap between slats is not enough to fit a standard toggle bolt; plan for hardware locations to land on furring or blocking, not in gaps.
When do pre-cut DIY slat wall kits make sense?
The measurement method in this guide works for scratch builds. But for many homeowners, the layout math, trim sourcing, and profile matching are the hardest parts of the project, not the physical installation.
Pre-cut kits solve those problems directly. A well-designed kit includes:
- Pre-cut and pre-labeled slats at consistent widths, so profile variation is already controlled
- Matched end pieces or L-channels in the same finish, so edge termination is a clip-and-adhere step rather than a sourcing problem
- Spacing presets built into the kit layout, with instructions that tell you exactly how many slats cover a given wall width
- Acoustic backing options integrated into the panel, removing the need to source and cut separate felt
- LED channel compatibility designed into the slat profile, so lighting integration does not require custom routing
When evaluating a kit, prioritize consistent slat profiles (measure a few pieces before installing), included end pieces in matching finishes, and clear layout instructions with labeled slat counts for standard wall widths. A kit that ships without matched trim forces you to source it separately, which usually means a visible finish mismatch.
Themediawallstore specializes in pre-cut, pre-labeled acoustic slat wall panels with integrated backing and matching trim options. For homeowners who want a professional result without sourcing every component individually, that is a meaningful time saver. The measurement formulas in this guide still apply if you choose a scratch build, and they are worth running even with a kit to confirm the layout before cutting anything.
For readers weighing a full DIY build against hiring out, the homeowner's guide to wall panel contractors covers when professional installation makes financial sense.
Key Takeaways
The most reliable slat wall spacing for residential decorative walls is 18 mm (11/16"), calculated using the formula TotalWidth = (N × SlatWidth) + ((N − 1) × Gap), installed with spacer blocks and finished with matched end trim.
| Point | Details |
|---|---|
| Choose your gap range first | Narrow (10–15 mm) for dense warmth, 18 mm for balance, wide (25–30 mm) for an airy or LED-friendly look. |
| Use the slat count formula | TotalWidth = (N × SlatWidth) + ((N − 1) × Gap); distribute any remainder into perimeter trim, not mid-wall gaps. |
| Build spacer blocks and a story pole | Physical spacers eliminate cumulative drift; a story pole transfers all layout marks in seconds on long runs. |
| Finish edges with matched trim | Matched end pieces or L-channels produce a professional result; caulk and paint do not hold up at open edges. |
| Themediawallstore kits remove layout math | Pre-cut, pre-labeled panels with spacing presets and acoustic backing options reduce installation time and sourcing errors. |
The detail most DIYers get wrong
Most spacing mistakes I see are not in the gap measurement itself. They are in the edges.
A wall where every gap is perfectly even but the end slats are trimmed with caulk and paint looks unfinished. The eye goes straight to the raw edge. Matched end pieces or aluminum L-channels are not optional finishing touches; they are what separates a DIY build from a professional one. The finishing trim guide from Aku Wood Panel recommends ordering 10% extra trim for cuts and waste, and covering any bottom gap with quarter-round. That is practical advice worth following.
The second mistake is skipping the mock-up. Spacing that looks right in a calculator feels different in a room with specific lighting, furniture color, and ceiling height. A 1-foot test strip costs almost nothing and takes 30 minutes. It has saved more than a few projects from a complete redo.
One non-obvious tip: for non-90° corners or walls that are not perfectly plumb, use exterior-grade corner trim pieces that wrap both faces simultaneously. Miter joints look clean in theory but fail quickly unless the corner is exactly square, which most residential walls are not. Wrap trim hides the imperfection and stays put.
The measurement-first approach in this guide works. But the finish is what people actually see.
Pre-cut slat wall kits that skip the layout math

If you have run the numbers and still want a faster path to a finished wall, Themediawallstore's pre-cut kits are built for exactly that situation. Each kit ships with pre-labeled slats at consistent profiles, matching end trim in the same finish, acoustic backing already integrated, and layout instructions that tell you how many slats cover your wall width without a calculator.
The concrete difference from a scratch build: you skip the profile-matching, trim-sourcing, and gap-preset steps that account for most of the planning time on a DIY project. Kits are available in multiple finishes including Smoked Walnut, Sandstone, Black, and Red Walnut, with optional LED channel compatibility designed into the slat profile.
Browse the full range of DIY media wall kits and accessories to find the finish and panel size that fits your wall, or check the accessories page for matching end pieces, trim channels, and acoustic add-ons.
Useful sources
A short list of planning tools and reference pages worth bookmarking before you start cutting:
- Themediawallstore slat wall designs and kits: Finished-look examples and pre-cut kit options with spacing presets, acoustic backing, and matched trim. A useful reference for visualizing how different gap sizes look at full scale before committing to a layout.
Final reminder: build a physical mock-up of at least 1–2 feet before full installation. No calculator or reference image replaces seeing your chosen gap size on your actual wall, in your actual light.
FAQ
How far apart should slats be on a decorative wall?
For most residential decorative walls, a gap of 18 mm (about 11/16") is the standard balanced choice. For a denser look, use 10–15 mm; for a more open, airy effect, use 25–30 mm.
How wide should slats be for a slat wall?
Slat widths of 40–50 mm (roughly 1 9/16" to 2") are the most common for decorative residential walls. The key rule is to keep the gap smaller than the slat width so wood reads stronger than void.
Should slat walls be vertical or horizontal?
Vertical slats draw the eye upward and are the most forgiving to install. Horizontal slats widen a space visually but require blocking into studs every 16–24 inches to prevent flexing, which adds backing prep time.
How much gap should you leave between slats?
A gap of 18 mm is the practical default. Use 10–15 mm for a warm, wood-heavy look or 25–30 mm when routing LED strips or reducing material cost. Retail slatwall uses a different standard: 3 inches on-center, which is a center-to-center measurement, not a visible gap size.