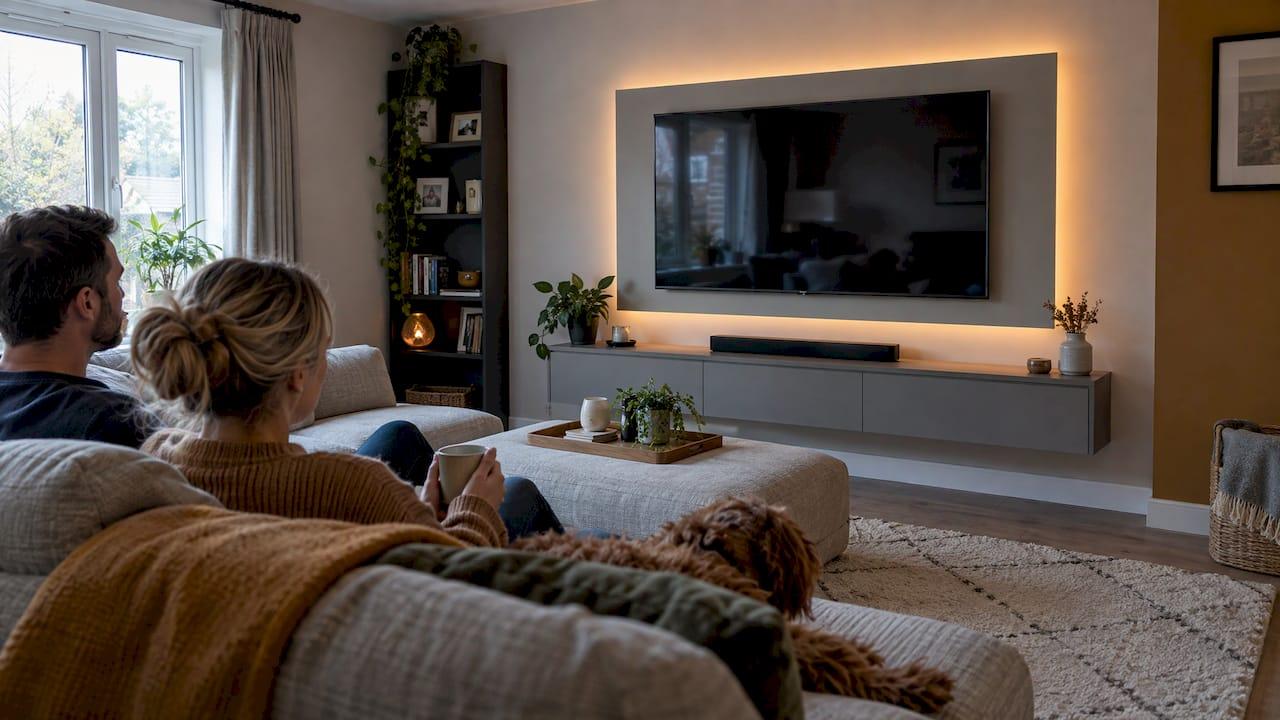
A diffused LED TV wall hides the LED diodes behind a frosted or opal cover and aims the light at the wall, not at your eyes. The result is a soft, continuous glow around the screen with no bright dots and no harsh line. You get it from four choices: an aluminum channel, an opal or frosted diffuser, enough gap and setback behind the edge that hides the strip, and a correctly sized low-voltage driver. This guide covers each choice, what a DIY build costs, and what to check before you power it on.
TL;DR
- Put the LED strip in an aluminum channel with an opal or frosted diffuser. That hides the dots and spreads the light into one even band.
- Give the light room: a shallow gap and a strip close to the edge make a hard bright line, while more gap and setback soften it.
- Choose warm to neutral white, dimmable, and keep the source out of your sight line to cut glare.
- Budget for the lighting and the wall separately. Lighting is a small part of the total, and a slat-panel or kit-based wall is a realistic weekend project.
- Anything line-voltage (receptacles, in-wall cable, hardwired drivers) is a job for a licensed electrician.
Table of Contents
- What "diffused" actually means
- Where the glow shows up: layouts that work
- Choosing the parts
- Gap, setback and the hard-line problem
- A weekend install plan
- What a DIY diffused LED TV wall costs
- Safety, code and heat: check before and after
- Our perspective
- Get the look without guessing
- FAQ
- Sources
What "diffused" actually means
A bare LED strip is a row of tiny, very bright points. Look at it from the sofa and you see dots and a hot line. A diffuser sits between the LEDs and your eyes and scatters those intense points across a wider surface, which reduces glare and blends the individual hotspots into one band.
In practice a diffused TV wall uses an aluminum profile that holds the strip, a cover that does the blending, and end caps. The channel also works as a heat sink, which matters for how long the strip lasts. The cover is what you see, so it decides how the light looks.
The cover options trade brightness for smoothness. According to SignliteLED's comparison, clear covers transmit 90 to 95% of the light but show the LED chips fully. Milky (opal or frosted) covers transmit 70 to 85% and reduce dot visibility to low or none. Black covers pass only 30 to 40% and hide the source completely. Milky covers are the most common choice for decorative and architectural lighting, and for a TV wall they are the right default.

A clear cover can still work where the strip is fully hidden, such as deep inside a cove. The moment any part of the strip can be seen from where you sit, choose opal.
Where the glow shows up: layouts that work
The surface and the structure in front of the LEDs change the look as much as the strip does. Here are the layouts we see homeowners choose most.
Backlit halo behind the TV
Concealed strip behind the screen makes the wall itself glow. With the TV off, the light is widest and softest at the edges. With it on, the halo reduces the stark contrast between the screen and a dark room. Warm or neutral white suits this best, and the light should never face the TV or shine straight at the screen.
Slat or fluted panels with light in the gaps
Wood slats turn light into lines. Gaps between slats show the glow and add texture, while fabric or solid surfaces give a smoother wash. Because the strip is seen through a narrow gap, a diffused or COB-style strip that fits flush is the usual choice. Treat this lighting as a feature, not as your reading light. Our Red Walnut acoustic slat wall panel is a good base for this look.

Lit niches and floating shelves
Recessed profiles can outline alcoves and backlight a TV recess, while lit shelves give you a display area. Plan these while the frame is still open, so the cable and driver are hidden for good. A shelf with built-in light, such as the Oslo Lux LED floating shelf, removes the channel work from that part of the wall.
Cove glow above or beside the wall
A cove washes the ceiling or side wall and makes the room feel taller. Keep cove and accent light indirect and pointed at a surface rather than at the room, which avoids glare.
Surface color changes the result
Indirect light loses brightness each time it bounces. Rough, dark or heavily textured walls reflect less than light, smooth ones, so a deep walnut or charcoal finish needs more output than a white one. Dark finishes absorb more light, which is why slat-wall lighting works best as one layer in a plan that includes lamps or dimmable downlights, not as the only source.
Choosing the parts
Strip type
For a standard backlit halo, a regular 24V strip in a channel with an opal cover is plenty. Where the strip is visible and there is little depth for diffusion, as in a narrow slat gap, a COB (chip-on-board) tape gives a continuous, dot-free line.
Channel and cover
Aluminum channels give a smooth glow and protect the strip from dust and damage. Hidden installs sometimes get by with adhesive alone, but any visible run belongs in a channel. Expect opal covers to lose some brightness: one engineering guide puts light transmittance at 60 to 70%, a loss of about 30% of raw brightness. Choose a slightly brighter strip to make up for it, and use a dimmer.
Color temperature
For evening viewing behind a TV, warm white (2700K to 3000K) feels relaxed. If you want a neutral-looking bias light for accurate picture perception, a 6500K strip at low brightness is the usual recommendation. Pick one temperature for the whole room and stay with it, or mix temperatures only on separate, dimmable circuits.
Driver and controls
The driver must be rated above the combined wattage of your runs. When you wire runs in parallel, leave at least 20% current headroom. Add a dimmer or remote and, if you want scenes, a smart controller. Keep the driver where you can reach it: behind a removable panel, in a cabinet or in a drawer. A buried driver turns a ten-minute swap into a demolition job.
Our lighting accessories cover the LED and ambient components for media walls, and our guides on dimmable LED TV walls and driver sizing and safe circuits go deeper on the electrical side.
Gap, setback and the hard-line problem
The most common disappointment with a backlit wall is a bright, hard stripe. It comes from geometry, not from the strip.
The glow depends on two distances: the gap between the panel or screen and the wall, and the strip's setback from the edge that hides it. A shallow gap with the strip near the edge produces a hard bright line. More gap and more setback give a soft edge. So, before you glue anything:
- Measure the bracket depth, the reveal and the length of each run.
- Mock the strip in place with a temporary tape and sit where you normally watch.
- Increase the setback until the line disappears from your seat and from standing height.
The same applies to LEDs placed too close to a decorative panel. They can show through as dots. So choose the light source first and the decorative surface second.
Two other mistakes are worth avoiding. Skipping the diffuser leaves visible dots, and putting the source in a sight line makes glare. Overloading a small profile or leaving gaps between runs gives uneven, hot-spotty lines. If glare still bothers you after the install, our TV glare fixes walk through quick adjustments.
A weekend install plan
A diffused LED lighting plan is easiest when you build it into the wall, not onto it. Here is the order we recommend.
- Plan the whole wall first. Mark the TV position, bracket, shelves, cable exits and driver location. Decide where power comes from.
- Bench-test everything. Connect the strip, driver and dimmer on the floor and run it for a few minutes before cutting or sticking anything.
- Prep the surfaces. Clean and degrease where the channel will sit so the adhesive holds.
- Dry-fit. Place channels and panels without fixing them and check the view from the sofa.
- Cut only at marked points. Strips can be cut only at the marks. Cap the cut ends.
- Mount the channels, then press in the strip. In slat gaps, press the strip in short sections so it sits flush.
- Wire the runs in parallel to the driver. Keep the driver reachable and the cable runs short to limit voltage drop.
- Fit the covers and end caps last, then power up and tune the dimmer.
If the wall is a kit, much of step 1 is done for you. Our kits ship with pre-cut, pre-labeled panels, hidden wire management and a modular system built for installation in a weekend, and you can see how that works on the How It Works page.
What a DIY diffused LED TV wall costs
The lighting is the cheap part. The wall around it is where the budget goes.
For the lighting itself, one DIY guide estimates a custom LED strip build at $30 to $80 in materials, with an aluminum channel and diffuser at $10 to $25, the strip at $10 to $30, a power supply at $8 to $20 and a controller or dimmer at $5 to $15. Prices vary with length, brightness and quality, so treat these as a ballpark for a single run.
For the wall, Stewart Milne Homes puts budget builds for an 8 to 10 foot media wall at $740 to $1,530 and mid-range builds at $1,430 to $2,570. Its line items include framing lumber at $150 to $400, drywall and finishing at $150 to $400, electrical parts at $50 to $150 and a TV bracket at $50 to $300. It also says doing it yourself usually saves 40 to 60%.
By style, Deavita's 2026 ranking lists a fluted or slat panel wall at $150 to $1,500 as a DIY weekend project. A full built-in with storage and LED backlighting is $1,500 to $9,000 or more, and it needs professional installation.
| Approach | What you get | Typical cost range |
|---|---|---|
| Lighting only (strip, channel, diffuser, driver, dimmer) | Halo or accent glow on an existing wall | $30 to $80 in materials |
| DIY media wall, budget to mid-range | Framed wall, finishing, bracket, electrical parts | $740 to $2,570 |
| Slat or fluted panel wall | Textured wall with light in the gaps | $150 to $1,500 |
| Full built-in with storage and backlighting | Custom joinery | $1,500 to $9,000+ |
The choices that move the total are wall size, finish, the amount of joinery, whether you add a fireplace or shelves, and how much of the work you hand to a pro. If you want a number for your own wall before you commit, our design services are priced on the shop page: Single Concept Design at $99, a 3 Concepts + Revision Design Package at $199, and Full Design & Quote at $299.
Safety, code and heat: check before and after
Low-voltage LED lighting is forgiving, but the supply and the wiring are not. Keep these points in mind.
Protect the strip. Electrical guidance for closets, for example, says flexible strips must be enclosed in protective housing, such as an aluminum channel with a lens and end caps. That is one more reason to put a visible strip in a channel with a diffuser rather than leaving it bare. The channel also acts as a heat sink, and a tape run bare on a wooden cabinet base runs hot and can fail early.
Know your circuit class. A Class 2 circuit under NEC Article 725 is limited to 30 volts and 100 volt-amps, and the same source suggests keeping voltage drop to 3% or less. Most 12V and 24V TV-wall strips fall into this category.
Check permits locally. Permit rules for low-voltage LED installs depend on your local Authority Having Jurisdiction. Many residential projects do not need one, but some cities, including Chicago and New York City, commonly require permits even for low-voltage systems. Call your building department before you start.
Leave line-voltage work to a licensed electrician. A receptacle behind the screen, in-wall cable, a switch or dimmer box, a junction box and a hardwired driver are all line-voltage jobs. Switch off the breaker before you make or disconnect any connection, and follow the manufacturer's instructions and local code.
If you live in California, your lighting plan may also touch energy code requirements. A licensed local electrician can walk you through California Title 24 lighting inspections so the inspection passes the first time.
After you power on, check three things over the first week: that the driver is warm but not hot, that no strip run looks dimmer at its far end (a sign of voltage drop), and that nothing in the glow is visible from your usual seats. Fix these at the start while the panels are easy to open.
Our perspective
We build media walls so a homeowner can get a high-end result without a contractor, and lighting is where that result is won or lost. The panels can be perfect and the wall still looks cheap if the LEDs show as dots.
That is why we design our kits around a modular system with hidden wire management, integrated LED lighting and floating cabinetry, so the channel, cable route and driver access are decided before you cut a single panel. Pre-cut, pre-labeled panels mean you spend the weekend on the light and the finish, not on measuring.
Our advice is simple: pick the diffuser first, give the light some depth, keep the driver reachable and choose a finish you love. If you want a second pair of eyes on the layout, our design packages and expert support are there for exactly that.
Jake
Get the look without guessing
If you want the diffused glow without piecing together channels, panels and cabinetry yourself, start with a DIY media wall kit. Our kits are designed for easy assembly in a weekend, with multiple finishes, integrated LED lighting and options for fireplaces and floating cabinetry. For a more finished lighting plan, browse our LED and ambient lighting range, or pick our Luxe Marble Glow kit if you like a lit, stone-look wall.
In the San Francisco Bay Area, we also offer custom design and white-glove installation. Our returns are risk-free, and we ship nationwide.
FAQ
Do I need a diffuser if the strip is hidden?
Not always. For hidden cove lighting where nothing is visible from your seat, a clear cover or even a bare strip in a channel may be fine. As soon as any part of the strip can be seen, use an opal or frosted diffuser so the dots disappear.
What color temperature is best behind a TV?
Warm white at 2700K to 3000K suits relaxed evening viewing. A neutral 6500K strip at low brightness is the usual choice for bias lighting when you want a neutral reference. Either way, keep the light off the screen and use a dimmer.
Can I install a diffused LED TV wall myself?
Yes, for the low-voltage parts: channels, strips, covers and a plug-in driver. Anything involving a new receptacle, in-wall cable, a junction box or a hardwired driver should be done by a licensed electrician, and you should check local permit rules first.
Why does my backlight show a hard bright line?
Usually the gap behind the panel is too shallow or the strip sits too close to the edge. Add depth or move the strip further back from the edge until the line fades from your seat. A diffuser helps, but geometry does most of the work.
Sources
- LED Light Diffusers: Hide Hotspots & Reduce Glare
- Diffusers Matter: Clear Vs Milky Vs Black LED Channel Covers
- Planning indirect lighting: wall, ceiling or TV area?
- Clear vs Diffused LED Profile Covers: Engineering Guide
- How to Build Custom LED Strip Lighting
- DIY Media Wall Build Guide: Costs, Steps, Pitfalls
- TV Wall Ideas 2026: Ranked Best to Worst
- LED Strip Lighting in Closets: NEC Compliance and Safety
- 15 NEC Code Questions Every Electrician Asks About LED
- One Visit, Not Three: Pass California Title 24 Lighting Inspections