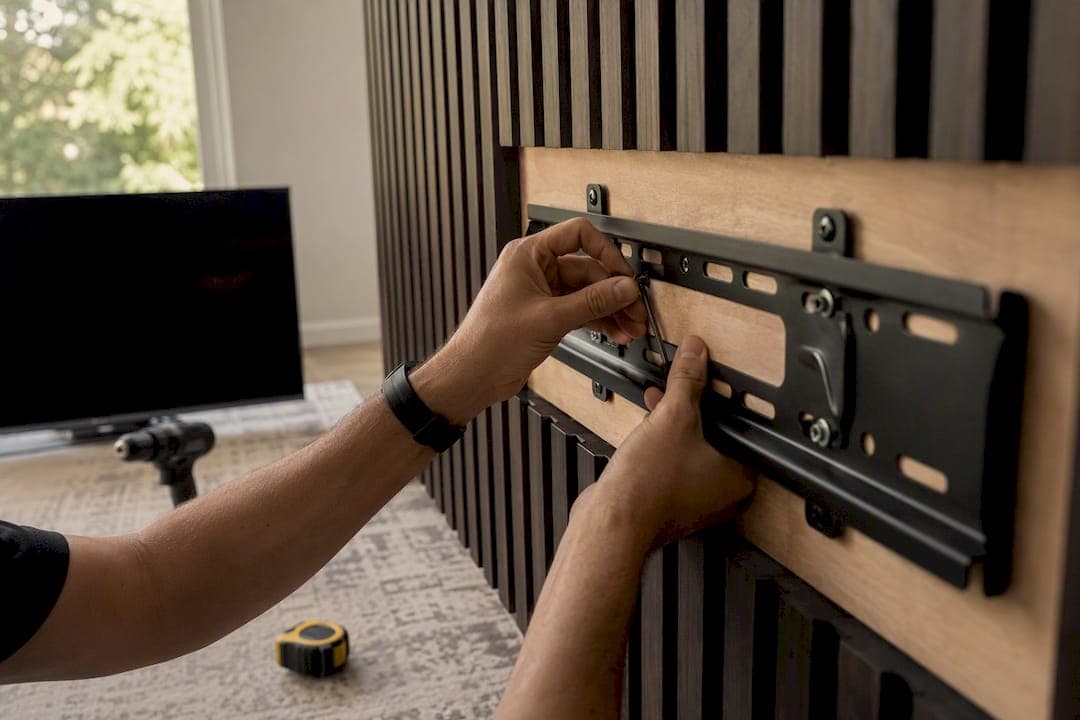
Yes, you can safely install slat panels behind a wall-mounted TV, as long as you build a solid substrate first and anchor the bracket into studs or that backing, never into the thin slats alone. Slats are a decorative skin. They look fantastic, but they're rarely thick or dense enough on their own to carry 40 to 80 pounds of hanging TV without eventually pulling loose.
The installation sequence is straightforward once you see it laid out: plan your layout and stud lines, build a plywood or furring-strip substrate, attach the slat panels to that substrate, mount the TV bracket through the panels into the solid backing, then route and hide your cables. Each stage depends on the one before it, so skipping the substrate step to save a weekend afternoon is the single most common way this project goes wrong.
If cutting your own slats and building a custom frame sounds like more carpentry than you signed up for, a pre-cut, pre-labeled kit from a company like Themediawallstore removes most of the guesswork. Every piece arrives sized and numbered, which cuts down on measuring errors and lets you focus on getting the mount right.
Before you touch a saw, confirm these basics:
- Locate every stud behind your planned panel area and mark them clearly.
- Decide whether you need a full plywood sheet or a furring-strip grid based on how uneven your wall is.
- Plan your TV bracket's hole pattern against your stud locations before cutting a single slat.
Pro Tip: Buy your bracket before you build your substrate. Bracket hole patterns vary by 4 to 8 inches between models, and building your backing around the wrong spacing means re-cutting plywood later.
Table of Contents
- How to Install Slat Panels Behind a TV: Choosing Your Method
- Planning and Measuring Your Layout Before You Cut Anything
- Building a Load-Bearing Substrate for the TV Mount
- Installing the Slats and Panels Onto the Backing
- How to Mount the TV Bracket Securely Through Slat Panels
- Cable Management and Power Behind the Slat Wall
- Finishing Touches, Paint, and Lighting for a Polished Look
- Troubleshooting Common Slat Panel Installation Problems
- Why a Pre-Cut Kit Changes This Whole Project
- What Actually Matters When You Install Slat Panels for a TV
- Helpful Resources for Slat Panel and Media Wall Projects
- The Honest Take on DIY Slat Wall Installs
- Get Your Slat Wall Installed With a Kit Built for This Exact Project
- Sources
- FAQ
How to Install Slat Panels Behind a TV: Choosing Your Method
Before you buy a single board, decide which of three routes fits your skill level, your wall, and your patience for cleanup. Each one gets you to a similar-looking finished wall, but the labor and risk involved are pretty different.
Prefab acoustic panels are the fastest option. These come as finished tiles, often with tongue-and-groove or interlocking edges, and many DIYers complete an entire feature wall over a single weekend using this approach, according to installation guides covering Japandi-style slatted wood TV walls. The tradeoff is that you're working within whatever panel sizes the manufacturer offers, and cutting around outlets or an off-center chimney breast takes more finesse.
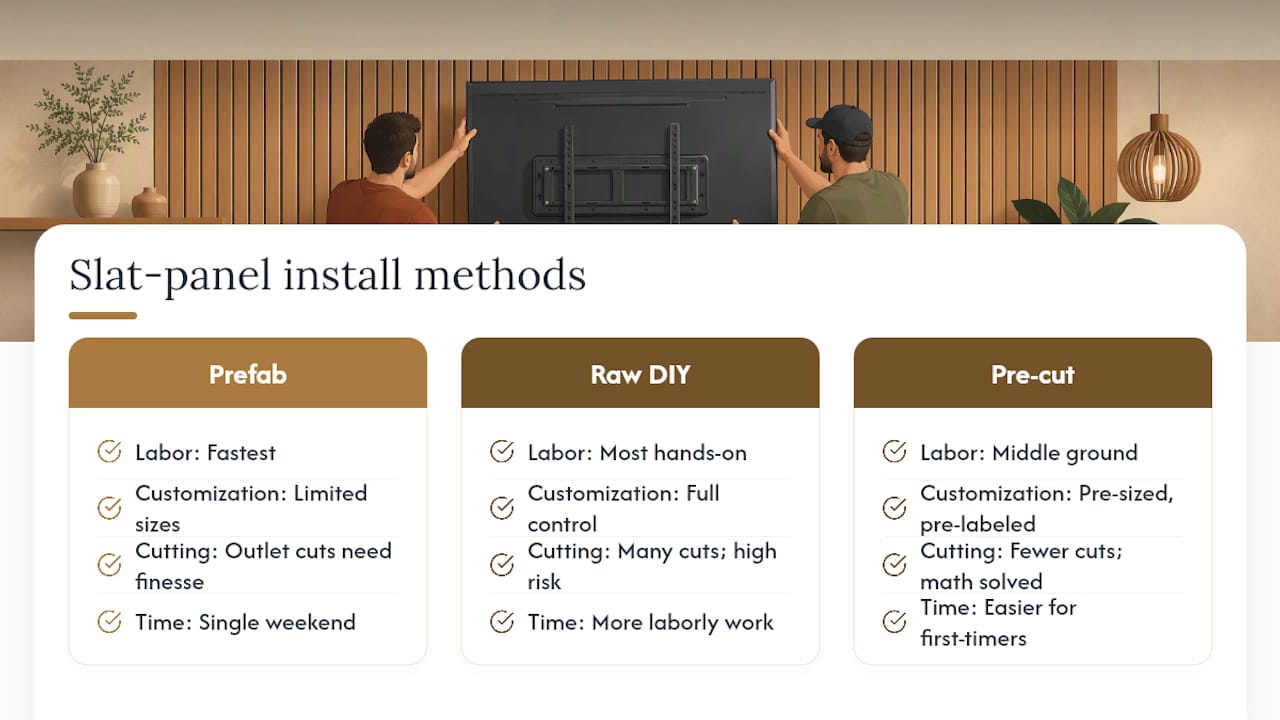
Raw slat DIY means buying individual boards, cutting them to length yourself, and spacing them by hand with scraps of wood or metal spacers. You get full control over slat width, gap size, and species. You also take on all the measuring risk. A single miscut board on a 10-foot run can throw off your spacing for the rest of the wall.
Pre-cut kits, like the ones Themediawallstore builds, sit in between. You still get individually sized, pre-labeled slats and a defined layout, but someone else has already solved the math. For a first-time installer nervous about running a table saw sixty times in a row, this matters more than it sounds like it should.
Material and finish shortlist
Your material choice affects both looks and mounting difficulty:
- MDF with wood veneer — the most budget-friendly, lightweight, easy to cut, but less durable if it gets wet.
- Solid oak — heavier, more expensive, takes stain beautifully, and holds screws better for hanging accessories.
- Walnut — rich, dark tone that works especially well behind a TV because darker finishes reduce visual contrast around a black screen bezel.
- PVC or composite slats — moisture-resistant, good for basements or humid climates, but harder to stain or refinish later.
Tools you'll actually need
Most of this project runs on tools many homeowners already own:
- Stud finder, laser level or 4-foot spirit level, tape measure, and pencil.
- Circular saw or table saw for straight rip cuts; a jigsaw for cutting around outlets or curved trim.
- Drill/driver, construction adhesive and caulk gun, brad nailer (a manual hammer and finish nails work, just slower).
- Safety glasses and a dust mask, especially when cutting MDF.
A nailer isn't strictly required if you're patient with adhesive clamp time, but it speeds things up considerably and reduces the chance of a slat sliding out of position while the glue sets.
Planning and Measuring Your Layout Before You Cut Anything
Get this stage right and everything downstream goes smoothly. Rush it, and you'll be pulling panels off the wall by Sunday afternoon.
- Find and mark every stud across the full width of your planned panel area, not just where the TV will hang. You'll need stud lines for the substrate, not just the bracket.
- Measure and mark your TV's center height. A common sightline target is 42 inches from the floor to the screen's center for seated viewing, though this shifts based on your couch height and room layout.
- Set a plumb vertical starting line using a laser level or a long spirit level, ideally centered on the wall or on the TV location itself. This line is what every slat gets measured against.
- Dry-fit a few panels without adhesive to confirm spacing, check that your cuts around outlets line up, and catch layout mistakes before anything is permanent.
- Map every cutout for outlets, existing power boxes, cable jacks, or a soundbar mount, marking exact locations on your substrate before you attach a single slat.
Panels should also sit in the room they'll be installed in for about 48 hours before installation, letting the wood adjust to your home's humidity and temperature. Skip this step in a dry winter climate and you may see gaps open up between slats a few weeks after installation as the wood shrinks.
Pro Tip: Don't trust your eye on the first panel. A quarter-inch of drift at the start of a 10-foot run can compound into a visibly crooked wall by the far edge. Recheck plumb every two or three panels, not just at the beginning.
Building a Load-Bearing Substrate for the TV Mount
This is the step people skip, and it's the reason a lot of slat wall TV mounts eventually fail. A structural backing gives your wall mount something solid to bite into and gives you a cavity to hide cables, according to guidance from panel manufacturers on step-by-step slat wall installation. You have two solid options here, and which one you pick depends mostly on how flat your existing wall is.
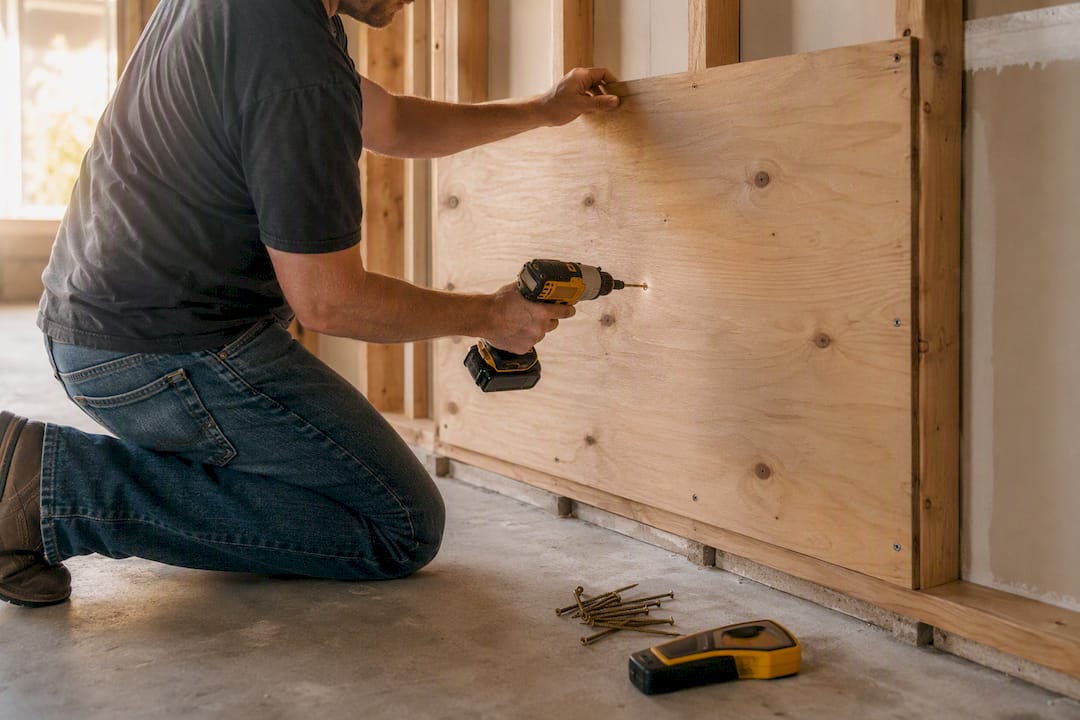
Plywood sheet method: Use 3/4 inch plywood, screwed directly into every stud at 16 or 24 inch spacing (whatever your framing uses), with screws every 12 to 16 inches along each stud line. On drywall over masonry, you'll need appropriate masonry anchors rated for the plywood's total weight plus the TV, not just the plywood alone. This method gives you one continuous, flat surface across the entire panel area, which makes cable routing and future bracket adjustments easier.
Furring-strip grid method: Instead of a full sheet, you attach horizontal and vertical strips (typically 1x3 or 1x4 lumber) directly to the studs, creating a grid. This works well when your existing wall is uneven, since you can shim individual strips to create a flat plane without covering the whole wall in plywood. It's also the better choice if you want a deeper cavity for cable runs or in-wall power boxes, since the gap between strips gives you room to work.
A full plywood sheet typically takes longer to install but gives you more mounting flexibility later, since you can move a bracket a few inches in any direction and still land on solid backing.
If you're planning in-wall electrical, whether that's a new outlet behind the TV or a recessed power kit, this is the point to bring in a licensed electrician. Running new circuits or cutting into existing wiring without the right permits and know-how isn't a place to improvise, and it's far easier to route conduit before your slats go up than after.
Installing the Slats and Panels Onto the Backing
With your substrate built and cured, this is where the wall actually starts to look like something.
- Apply adhesive in a serpentine bead, keeping it about half an inch from each panel edge so squeeze-out doesn't show at the seams. Manufacturers recommending this pattern also suggest backing it up with temporary brad nails to hold panels in place while the adhesive fully cures, per Strama Panels' installation guide.
- Set your first panel exactly on your plumb line. Everything else references off this piece, so double check level and plumb before the adhesive grabs.
- Work outward in both directions if you're centering the layout, or left to right if you're starting from a corner.
- Let the adhesive cure per the manufacturer's stated time, typically 24 hours, before removing brad nails or applying heavy pressure to the panels.
If you're using individual raw slats rather than interlocking panels, spacing consistency is the whole game. Use physical spacers, either purpose-made plastic spacers or scrap wood cut to your gap width, and check with a scrap piece every few slats rather than eyeballing it. Sash clamps can help hold a run tight while adhesive sets, especially on longer horizontal runs.
Interlocking or tongue-and-groove panels solve most of this automatically. The panels self-align, which removes the need for spacers entirely and makes consistent gaps far easier for a first-time installer to pull off. If you've never hung wall paneling before, this is the detail that saves you the most frustration.
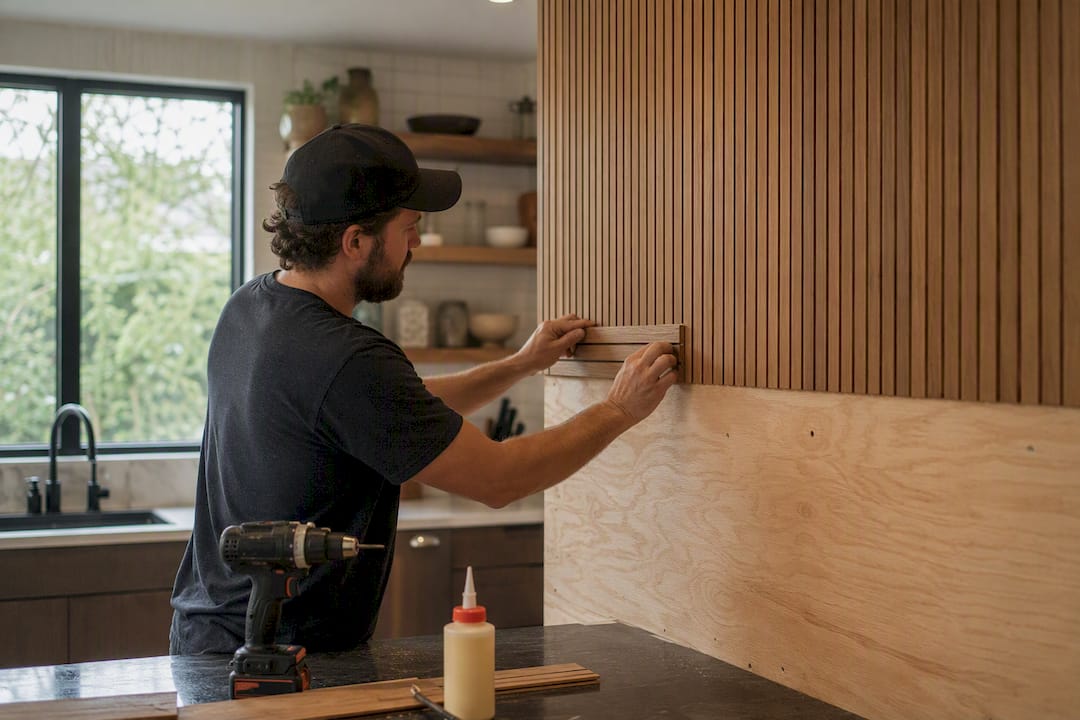
For cutting around outlets or trim, mark your cutout on the back of the panel first, then cut from the front face with a jigsaw to avoid splintering the visible surface. Sand any exposed cut edges before your final finish coat, since raw MDF or veneer edges absorb stain and paint differently than the factory face and will show as a slightly different shade if left untreated.
Themediawallstore's acoustic wall panel four-pack in walnut is built around this interlocking system, which is worth considering if hand-spacing forty individual slats sounds like more precision work than you want to sign up for on a Saturday.
How to Mount the TV Bracket Securely Through Slat Panels
This is the step where a beautiful wall either holds a 65-inch TV safely for the next decade or becomes a very expensive shelf failure. Take your time here.
- Transfer your bracket's hole pattern onto the plywood or substrate location, not just the visible slat surface, using the layout you planned before construction started.
- Drill through the slat face carefully using a slightly undersized pilot bit first, which prevents the wood from splitting or blowing out around the hole, especially with veneer or thinner MDF slats.
- Hit solid backing, not just slats. Fasteners need to penetrate into your studs or your plywood substrate with adequate thread engagement, generally at least 1.5 inches into solid wood, to hold TV-mount loads safely.
- For larger or heavier screens, professional installers often add a dedicated plywood mounting plate or a recessed mounting block fastened directly to the studs behind the slats. The plate absorbs the bracket's load entirely and stays hidden once the panels go back up.
- Test before you trust it. Once the bracket is in, apply firm downward and outward pressure by hand before hanging the TV. Recheck level and tilt after the TV is mounted, and give it a second check after a week, since adhesive and fasteners can settle slightly under sustained load.
Pro Tip: If your wall studs don't line up conveniently with your bracket's hole pattern, that's exactly why the plywood substrate matters. It lets you place mounting screws anywhere across its surface while still transferring the load back into the framing behind it.
Cable Management and Power Behind the Slat Wall
Nobody wants to admire a gorgeous slat wall with a tangle of cords hanging beneath the TV. The good news is you have options ranging from simple to fully in-wall, depending on your budget and how permanent you want the solution to be.
In-wall power kits let you run a cord from behind the TV down to an outlet at a lower, hidden location, without cutting into your home's actual wiring. These low-voltage pass-through kits are generally DIY-friendly. Anything involving a new electrical circuit or moving an existing outlet, though, calls for a licensed electrician, since you're dealing with code requirements around fire-blocking and outlet placement that vary by jurisdiction.
Recessed power boxes built into your substrate before the slats go up give you a clean spot for HDMI, power, and any AV cables to pass through. Small grommets or a discreet access panel let you reach cables later without tearing the wall apart if you upgrade your TV or add a soundbar down the road.
If you're renting or just don't want anything permanent, prefab acoustic panels can go up using heavy-duty mounting strips or screws through felt backing rather than adhesive, making the whole wall removable when you move out. It's worth checking Themediawallstore's panel interior design guide for more detail on planning cable access before you commit to a layout.
Finishing Touches, Paint, and Lighting for a Polished Look
The details you add after the slats are up are what separate a good-looking wall from one that looks custom-built.
Painting the substrate cavity matte black, or lining it with black acoustic felt, hides any wall color that peeks through the gaps between slats and creates a shadow-line effect that visually deepens the whole installation, a technique repeated across design guides covering slatted wall panel finishes behind a TV. It also reduces contrast around the black bezel of your screen, so the TV blends into the wall instead of standing out as a bright rectangle.
For trim, add a simple reveal or shadow gap at floor and ceiling rather than a chunky baseboard, which keeps the look clean and modern. Fill and sand any visible nail holes from your brad nailer before your final finish coat, and seal exposed edges with a matching stain or clear coat so moisture doesn't creep in over time.
If you're adding LED backlighting or bias lighting, plan the wiring route before your panels go on, not after. Common placements include:
- Behind the slats near the top edge, washing light up the wall for ambient glow.
- Directly behind the TV, reducing eye strain during nighttime viewing.
- Along the floor reveal, for a subtle uplighting effect.
Run your LED strip's power cable through the substrate cavity you already built for AV cables, and check whether your chosen strip needs a dimmer-compatible driver before you buy it.
Pro Tip: Test your LED placement with the strip taped up temporarily before final installation. Lighting that looks great in daylight photos can read as too harsh or unevenly spaced once the room is dark.
Troubleshooting Common Slat Panel Installation Problems
Even careful installs run into snags. Here's how to fix the ones that come up most often.
If you notice your panel run drifting off plumb partway through, don't wait until the wall is finished to fix it. Pull the panels back to the point where the drift started, re-check your original plumb line, and reset from there. It's a frustrating step backward, but far less work than living with a visibly crooked wall or trying to correct it with wedge-shaped shims at the end of the run.
Adhesive failure usually shows up as a slat that feels slightly loose or has a visible gap forming at one edge. Add a few brad nails or screws through the slat into the substrate at the loose section rather than trying to re-glue an already-set bond. Warped panels, often from skipping the acclimation period, may need to be replaced outright since a bowed slat rarely flattens back out once it's cut and mounted.
Before you finalize anything, think about future access. If you ever need to service a cable connection or swap a TV bracket, adhesive-only panels make that difficult, while a design using screws or a removable access panel keeps that door open. It's also worth checking your panel manufacturer's return policy before committing to a permanent adhesive install, since some warranties don't cover panels once they've been cut or glued down.
Why a Pre-Cut Kit Changes This Whole Project
Everything described so far, measuring, cutting, spacing, and building a substrate, is real carpentry work, and it's exactly where a pre-cut kit earns its price. Themediawallstore's kits arrive with every panel pre-cut and pre-labeled, which eliminates the two biggest sources of DIY error: miscutting a board and losing track of which piece goes where on a 10-foot wall.
That matters most for a first-timer working solo on a weekend, where a single measuring mistake can turn a two-day project into a two-week one. Over 1,000 customers have gone through this process with Themediawallstore's kits, backed by expert support if you get stuck mid-install and risk-free returns if the finished look isn't right for your space.
A kit isn't the right call for every wall. If your space has an alcove, an odd chimney breast, or you're integrating a fireplace insert alongside the TV, custom design work handles those irregularities better than a standardized kit ever will. But for a rectangular wall behind a TV, a kit removes almost all the guesswork a raw-material build carries.
Where a kit makes the most sense:
- Standard rectangular wall sections with no major obstructions.
- First-time installers who want a defined parts list and clear instructions.
- Anyone prioritizing a finished wall in a single weekend over customizing every dimension by hand.
Where raw materials or custom design still win out:
- Walls with fireplaces, alcoves, or irregular angles.
- Installations requiring new electrical work planned around a custom cavity.
- Homeowners who want a specific wood species or slat width not offered in standard kit sizing.
What Actually Matters When You Install Slat Panels for a TV
The single biggest determinant of success is whether your TV mount is anchored into something solid enough to hold its weight for years, not just for the afternoon you hang it.
| Point | Details |
|---|---|
| Build a solid substrate first | Never mount a TV bracket into slats alone; anchor into plywood backing or studs. |
| Let panels acclimate | Give panels 48 hours in the room before installing to prevent warping and gaps. |
| Get the first panel plumb | A quarter-inch of drift at the start compounds into visible misalignment across a full run. |
| Plan cables before slats go up | Map outlets, power boxes, and LED wiring before attaching any panel to the substrate. |
| Consider a pre-cut kit | Themediawallstore's kits reduce measuring errors and speed up standard-wall installs to a single weekend. |
Helpful Resources for Slat Panel and Media Wall Projects
For adhesive technique and panel spacing details, the step-by-step installation guide from Strama Panels is worth bookmarking. If you're weighing interior panel styles beyond slats, One Day Doors & Closets' guide to interior panel doors covers coordinating trim and finishes. For kit options and finish choices, browse Themediawallstore's shop.
The Honest Take on DIY Slat Wall Installs
Most guides on this topic obsess over slat spacing and adhesive brands, and honestly, that's the least important part of the whole project. The substrate is where projects succeed or fail. I've seen plenty of gorgeous slat walls posted online that never mention what's actually holding the TV up, and that's the detail that matters most once you're three months in and the bracket starts to sag.
Conventional DIY advice treats the plywood backing as an afterthought, a quick mention before jumping straight to the fun part of arranging pretty wood slats. Flip that priority. Spend your planning time on stud location and substrate thickness, and the slat work becomes almost meditative by comparison.
Where I'd push back on the purist DIY crowd: there's no shame in a pre-cut kit. Cutting forty identical slats with a table saw isn't a skill worth proving if a kit gets you the same result with less risk of a ruined board on cut thirty-one. Save your effort for the parts of the project that actually require judgment, like getting that first panel dead plumb.
Get Your Slat Wall Installed With a Kit Built for This Exact Project
Building your own substrate, cutting slats to size, and hoping your spacing stays consistent across a 10-foot wall is real work, and skipping straight to a kit is the fastest way to a mounting-safe result without a table saw marathon. Themediawallstore's pre-cut, pre-labeled kits are numbered and sized before they ever leave the warehouse, so the measuring errors that derail most first-time installs simply aren't part of the process.

Kits come in finishes ranging from deep black acoustic slat panels for a shadow-line look to warmer tones like smoked walnut, and every design already accounts for TV mounting and cable routing, including layouts like the Floating TV Panel if you want the TV and cabinetry to appear to hover off the wall. Over 1,000 customers have completed this project with expert support available if a step trips you up, plus risk-free returns if the finished look isn't the one you pictured.
If your wall is a standard rectangle behind the TV, browse the current kit lineup and see which finish matches your room before you buy a single sheet of plywood.
Sources
FAQ
Can you mount a TV on a slat wall?
Yes, as long as the TV bracket anchors into a solid substrate, plywood backing or the wall studs themselves, rather than into the decorative slats alone.
How do you attach slat wall panels to the wall?
Most installers use a serpentine bead of construction adhesive combined with temporary brad nails to hold each panel in place while the adhesive cures, typically over about 24 hours.
How do I mount my TV securely on wood paneling?
Transfer your bracket's hole pattern onto your plywood substrate before installing panels, then drill through the slat face into that solid backing, or into studs directly, using fasteners rated for your TV's weight.
How long does a slat panel installation take?
Plan for 48 hours of acclimation before installing, plus roughly 3 to 5 hours of active work for a typical 10 by 8 foot feature wall.
Is a pre-cut kit easier than building a slat wall from scratch?
Yes, for standard rectangular walls. A pre-cut, pre-labeled kit from a company like Themediawallstore removes most measuring and cutting errors, which is usually the biggest source of mistakes for first-time installers.