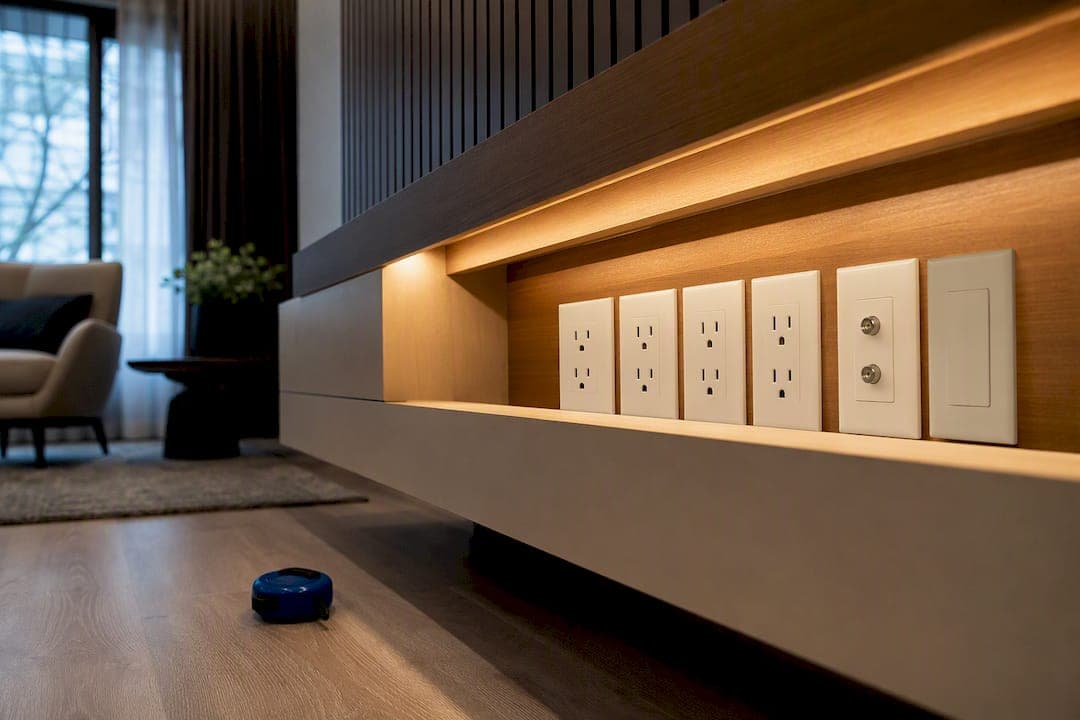
Plan for 6 to 10 receptacles in the media zone, clustered in three spots: a recessed power box directly behind the TV, an equipment bay outlet for the console and receiver, and a dedicated circuit for a soundbar or amp. Use a listed in-wall power kit or a licensed electrician for every line-voltage run, and keep coax, Ethernet, and HDMI pathways physically separate from that wiring. Add one spare conduit run now. It's the cheapest insurance you'll buy on this project.
TL;DR:
- Outlets should be clustered in three zones: behind the TV, in the equipment bay, and for the soundbar or accent lighting, with a spare conduit run during framing.
- The ideal height for media wall outlets ranges from 40 to 48 inches from the finished floor, based on TV size and mount thickness, with a mock-up recommended before cutting.
- Recessed in-wall power kits provide a cleaner finish than surface outlets but require proper planning, listed hardware, and slack in cables for future upgrades.
- Run separate conduit and dedicated low-voltage pathways for HDMI, Ethernet, and coax, and pull extra cables and labels for ease of future troubleshooting.
- Proper planning of outlet placement enhances room aesthetics, aligning with furniture and sightlines, and considering surface material differences for flush and hidden installs.
Table of Contents
- Outlet Placement Media Wall Planning: Count and Locations
- What Height Should Media Wall Outlets Be?
- Recessed vs Surface Outlets: Which One Fits Your Wall?
- Cable Management and Future-Proofing Behind the Wall
- Fireplace Media Walls: Where Do the Outlets Go?
- Step-by-Step Checklist Before You Board the Wall
- Does Wall Material Change Where Outlets Go?
- Powering Streaming Boxes, Hubs, and Extra Speakers
- How Outlet Placement Shapes the Look of the Room
- USB Outlets and Wireless Charging Near the Media Wall
- Why Outlet Planning Is the Step DIYers Skip
- How Themediawallstore Simplifies Outlet Planning
- Sources
- FAQ
Outlet Placement Media Wall Planning: Count and Locations
Start by counting devices, not guessing at outlets. A typical setup runs a TV, soundbar, one or two streaming boxes, a game console, an AV receiver, and sometimes accent lighting behind a slat panel or floating shelf. That's usually five to seven plug-in devices before you even add a router or smart hub.
- Behind the TV — one recessed outlet for the display, plus a low-voltage pass-through for cables.
- Equipment bay — two to four outlets for the receiver, streaming devices, and game console, ideally on their own circuit.
- Soundbar or center-channel location — a dedicated outlet if the soundbar sits below the screen rather than in the equipment bay.
- Accent lighting — a switched or plug-in outlet if you're running LED strips behind panels.
For a slim recessed TV mount, one recessed box behind the display handles power and cable pass-through in a single opening. A built-in media wall with cabinetry needs more spread. Put outlets inside cabinet cavities rather than relying on one central cluster. Separate the receiver's circuit from general lighting where you can. Amplifiers run warm, and a circuit shared with too many draws trips breakers at the worst moment, usually during a movie's opening scene.
What Height Should Media Wall Outlets Be?
The target is simple: align the outlet centerline with where the TV's center will sit, which for most seating setups lands around 40 to 44 inches off the finished floor. Measure from your seated eye level, not from a tape-measure default, since a low platform bed or a tall accent chair shifts that number by several inches either way.
Here are workable outlet centerlines by screen size, based on standard mount thickness and typical sofa seating:
- 50-inch TV: roughly 40 inches to outlet center
- 65-inch TV: roughly 44 inches to outlet center
- 75-inch and larger: roughly 48 inches to outlet center
Add half an inch to an inch if your mount bracket is unusually thick, since the box needs clearance behind the panel, not just behind the drywall surface.
Pro Tip: Mock up the TV height with painter's tape and a helper standing in for the screen before you cut any openings. It takes ten minutes and it's the single best way to avoid a recessed box that ends up two inches off from dead center.
One code note worth remembering: the National Electrical Code governs receptacle spacing in most living areas, not a mandated height for every outlet. Height conventions like the ones above come from installer practice and manufacturer guidance, not a blanket federal rule, so always confirm specifics with your local Authority Having Jurisdiction before finalizing box placement.
Recessed vs Surface Outlets: Which One Fits Your Wall?
A recessed in-wall power kit is the cleanest option for a flush finish. These kits pair a code-listed recessed box with a low-voltage brush plate, letting the TV sit almost against the wall with no visible cord bulge. Echogear's in-wall media box and Legrand's in-wall power and cable-management kit both bundle a tamper-resistant receptacle, a recessed box, and a removable trim ring, which matters more than it sounds like it should when you're servicing the wall two years later.
Surface retrofit devices, sometimes called flat-panel outlet relocators, are a different category. A surge-protected relocator sold at Home Depot moves an existing outlet behind the TV without opening the wall, which works for a rental or a quick fix. It's rarely as tidy long term as a proper recessed kit.
A few rules apply no matter which route you pick:
- Use listed hardware only. Never run an appliance cord through a wall cavity unless it's part of a listed kit or installed by a licensed electrician.
- Leave slack in every cable run. Future gear rarely matches today's cable length exactly.
- Choose a box with a removable trim ring so you can access wiring without patching drywall.
Pro Tip: If you're mounting on brick or masonry, budget extra time for the recessed box. Cutting into mortar joints instead of block face saves you from hitting rebar or a structural tie.
Cable Management and Future-Proofing Behind the Wall
Line-voltage and low-voltage wiring should never share a box or a knockout. Run your 120-volt power to the recessed receptacle and route HDMI, Ethernet, and coax through a separate low-voltage plate with a brush or grommet opening. This isn't just tidiness. Crossing them invites interference and, in some configurations, a code violation.
- Install a length of 1-inch flexible conduit between the TV location and the equipment bay wherever the wall cavity allows it. This turns a future HDMI upgrade into a five-minute pull instead of a wall repair.
- Pull at least one spare Ethernet and one spare HDMI line beyond what you need today, then cap and label both ends.
- Leave 12 to 18 inches of slack coiled at each end before boarding, since drywall crews and painters shift box positions more than you'd expect.
- Sketch the run locations on your framing plan, and photograph the open wall before it closes. That photo is worth more than memory when you're troubleshooting next year.
Installers who specialize in home theater cable runs consistently point to conduit and spare pulls as the cheapest insurance in the whole project. It costs a few dollars in materials during framing and saves a full wall repair later. If you're not ready to run conduit yourself, our guide on hiding wires without cutting walls covers lower-effort options that still keep the front of the wall clean.
Fireplace Media Walls: Where Do the Outlets Go?
Mounting a TV above a fireplace changes the math. A common rule of thumb places both the power outlet and the low-voltage opening about 12 to 15 inches above the mantel, high enough to clear heat exposure but still close enough to the TV's typical mount height.
- Measure actual wall surface temperature during a fire cycle before finalizing the box location. Some fireplace surrounds run hotter than the rule of thumb assumes.
- Check your TV manufacturer's maximum operating temperature. Heat-damaged panels rarely show symptoms until months later.
- Consider routing power and cable to a remote equipment bay in an adjacent cabinet instead of directly above the firebox, then running conduit up to the TV location.
- Add a small ventilation gap or thermal break behind the recessed box if the mantel surround runs unusually warm.
Step-by-Step Checklist Before You Board the Wall
- Confirm the TV size and mount type, then mark the screen center and stud locations directly on the framing.
- Lay out every outlet and low-voltage plate location on the studs before you run a single cable, using chalk or a marker visible through the insulation.
- Decide between a recessed box, an in-wall kit, or a surface relocator, then install conduit and low-voltage runs to match.
- Pull at least one spare Ethernet and HDMI line beyond what's needed today.
- Label every cable at both ends, verify your circuit has capacity for the added load, and schedule a licensed electrician for the line-voltage connections.
- Photograph or sketch an as-built record of every run before boarding closes the wall for good.
Pro Tip: Tape a printed copy of your outlet layout inside a nearby cabinet door before you close the wall. It sounds low-tech, but it's the fastest way to answer "where's that spare Ethernet line" three years from now.
Does Wall Material Change Where Outlets Go?
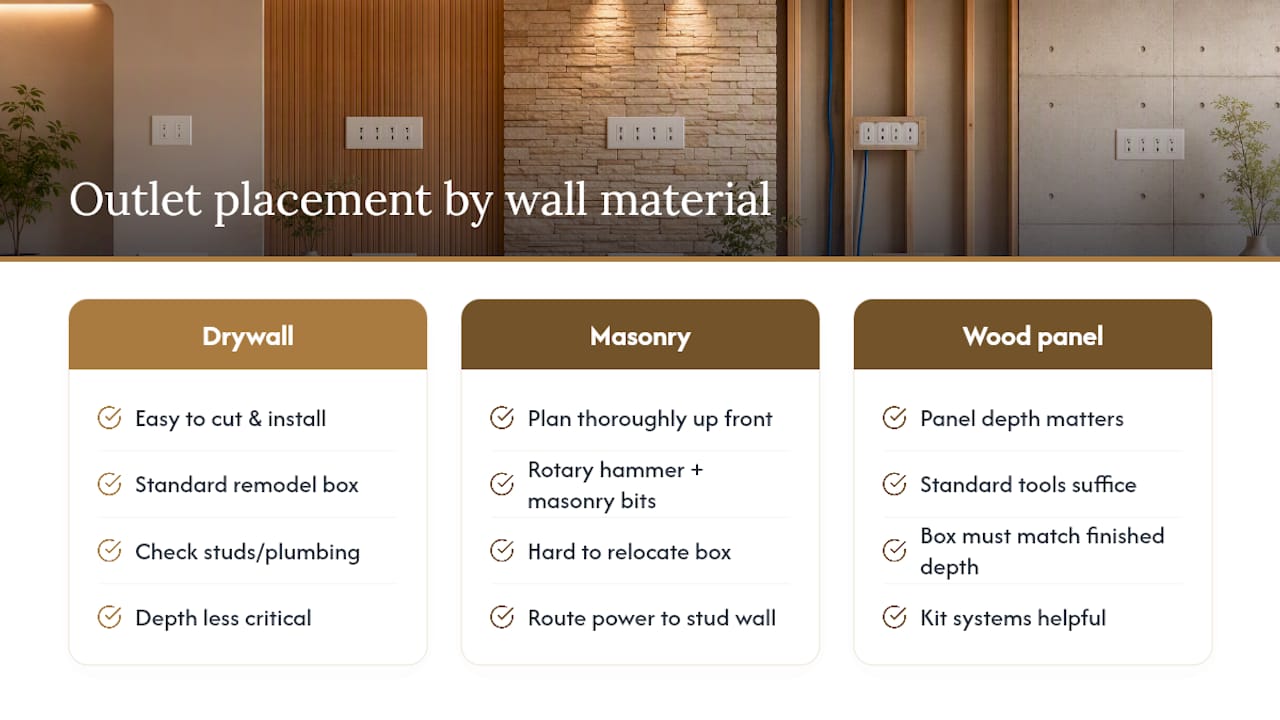
Drywall is the most forgiving surface for outlet placement. Standard remodel boxes cut cleanly, and a recessed kit installs in under an hour once studs are located. The main risk is cutting into a stud bay that's already carrying plumbing or HVAC ductwork, so always check behind the surface with a stud finder that detects metal and moisture before cutting.
Brick and masonry demand more planning up front. You can't easily relocate a box once it's cut into mortar or block, so measure twice and mock up the TV position before touching a drill. Masonry bits, a rotary hammer, and extra time are non-negotiable, and mortar joints cut cleaner than solid brick face. If the fireplace surround itself is masonry, route power to an adjacent stud wall where possible and bring cable to the TV location through conduit instead of cutting the brick directly.
Wood paneling and slat accent walls add a different wrinkle: depth. Slat panels and acoustic paneling sit proud of the wall surface by an inch or more, which changes how deep your outlet box needs to sit to end up flush with the finished panel face, not the drywall behind it. Plan the box depth around the finished wall thickness, including furring strips, or you'll end up with a receptacle that's recessed too far to plug into comfortably. This is one area where a kit-based system pays off, since panel and trim depths are documented in advance rather than improvised on site.
Whatever the surface, mark your outlet centers on the substrate before the finish material goes up. Retrofitting a box into finished slat paneling or brick is far more disruptive than doing it right the first time.
Powering Streaming Boxes, Hubs, and Extra Speakers
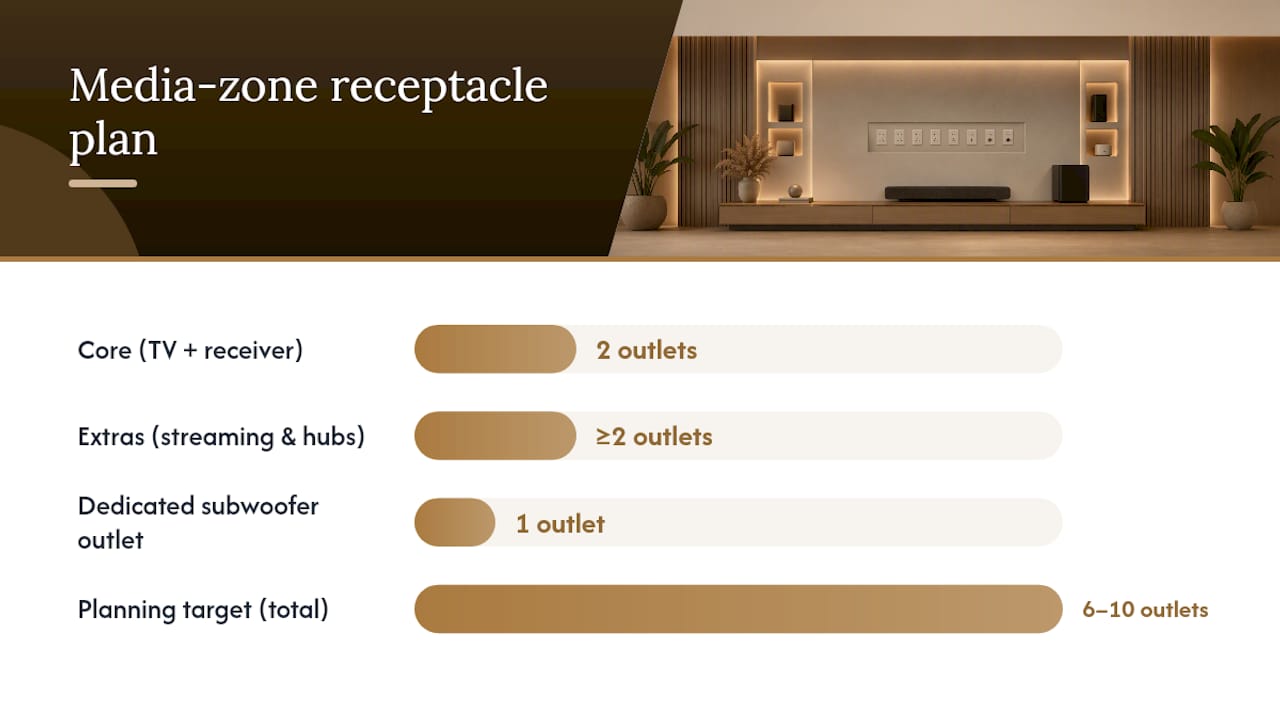
A modern media wall carries more devices than the TV and a receiver. Streaming boxes, smart home hubs, mesh Wi-Fi points, and a soundbar's wireless subwoofer all need power, and most of them run on small wall-wart transformers that eat up outlet space fast.
Plan for at least two extra outlets beyond your core TV and receiver count specifically for these secondary devices. A practical planning target of 6 to 10 receptacles in the media zone accounts for exactly this kind of creep, since streaming sticks and hubs multiply faster than most people expect once the wall is finished and gear starts arriving.
Group these devices logically rather than scattering them. A powered outlet strip inside the equipment bay handles the streaming box, hub, and any small transformer bricks in one spot, keeping cable clutter out of sight. If your smart home hub needs a strong Wi-Fi signal and the equipment bay sits inside a closed cabinet, that's a problem worth solving before boarding, not after. Either plan for a vented cabinet front or route the hub to an open shelf nearby.
Wireless subwoofers deserve their own outlet consideration too, since they're often placed away from the main media wall, near a corner for bass response. Don't assume the nearest baseboard outlet will be close enough. Measure the actual planned speaker location and add an outlet there if needed, rather than running an extension cord across the floor.
How Outlet Placement Shapes the Look of the Room
A media wall lives or dies on what you don't see. Outlet placement is the single biggest factor in whether the finished wall looks intentional or looks like an afterthought with cords crawling across the baseboard.
Furniture placement and outlet placement have to be decided together, not in sequence. If your console table or floating cabinet is going to sit off-center from the TV, plan the equipment bay outlets to match that actual furniture position, not a generic centerline. A console that's slightly offset for room flow, but with outlets centered dead behind the TV, forces you to run cable sideways behind the wall or leave a visible run along the baseboard.
Consider the sightlines from your main seating position. An outlet that's perfectly logical from a wiring standpoint can still be visually distracting if it sits at eye level next to open shelving or a slat panel with visible gaps. Recessed boxes solve most of this, but even a recessed plate has a visible faceplate. Choosing a plate finish that matches or complements the wall material, matte black against dark paneling, white against a painted wall, keeps that necessary hardware from becoming a focal point.
Floating shelves and accent lighting add another layer. If you're running LED strips behind a shelf or slat panel, that outlet needs to land inside the shelf cavity or cabinet, never on the visible wall face beside it. Getting this right during framing, before the panels or shelves go up, is far easier than trying to hide a stray outlet after the fact.
USB Outlets and Wireless Charging Near the Media Wall
Standard outlets aren't the only power decision worth making. USB and USB-C outlets built into the wall plate are worth adding near the equipment bay or console area, especially if you're regularly charging a phone, tablet, or remote control near the seating area. They eliminate one more wall-wart transformer competing for space in an already crowded outlet cluster.
Wireless charging integration is a newer consideration, and it works best when planned into a floating shelf or console top rather than the vertical wall itself. A charging pad recessed into a shelf surface near the seating area covers phones and some accessories without adding another visible cord at all. It's not a replacement for your core outlet count. It's a convenience layer on top of it.
If you're adding either option, plan the wiring during first-fix just like any other outlet. A combination USB/AC wall plate still needs a standard electrical box behind it, and wireless charging shelving needs its own low-voltage or USB power run depending on the product. Deciding this after the wall is closed means surface-mounted cords, which defeats the whole point of planning a clean media wall in the first place.
Why Outlet Planning Is the Step DIYers Skip
The most common mistake isn't a wrong measurement, it's sequence. Panels go up, the console gets placed, and only then does someone realize the equipment bay has two outlets for five devices. Pre-cut, pre-labeled kits work because the panel layout and the recessed outlet paths get decided together, before anyone picks up a drill. Buyers in design consultations almost always ask the same question first: "where does the power go." Answering that before the panels arrive is what separates a smooth install from a weekend of returns and rework.
— Jake
How Themediawallstore Simplifies Outlet Planning
Themediawallstore builds outlet and cable planning into the kit itself, instead of leaving it for you to improvise mid-install. Every pre-cut panel is designed with recessed openings and low-voltage pathways mapped out in advance, so you're not guessing where a box needs to sit relative to a slat panel's finished depth or a floating shelf's cavity.

Beyond the kits, the accessories catalog covers recessed plates and cable-management hardware sized to fit the panel systems, so you're not hunting for parts that almost fit. If your project includes a fireplace surround, the electric fireplace TV stand with linear insert shows how power and low-voltage openings integrate around a heat source without exposed cords. Browse the full kit catalog to see panel and outlet layouts side by side, or request a design consultation if you want a second set of eyes on your outlet plan before you pick up a drill.
Sources
- Echogear — In-wall TV media box product page
- Legrand — In-wall power and cable management TV connection kit
- Data Wire Solutions — Home media wall setup: cable management
- dgfloors — Outlet box height guidance (2026)
FAQ
Where should sockets go on a media wall?
Cluster them in three zones: a recessed outlet directly behind the TV, two to four outlets in the equipment bay for the receiver and streaming devices, and a dedicated outlet for a soundbar if it sits separately from the main gear cluster.
What is the 2-6-12 rule for outlets?
It's a general kitchen and workspace guideline for spacing outlets along countertops. It doesn't apply to media wall planning, where outlet placement is driven by TV height, equipment location, and device count instead.
Where should the outlet be for a wall-mounted TV?
Center the recessed outlet behind where the TV's midpoint will land, typically 40 to 44 inches from the finished floor depending on screen size, and confirm the exact height against your seated eye level before cutting.
How close can an outlet be to a sink under code?
Most residential codes require receptacles near a sink to sit at least 12 inches away and be GFCI-protected, though this applies to kitchens and bathrooms, not media walls. Always verify the exact clearance with your local Authority Having Jurisdiction, since amendments vary by municipality.