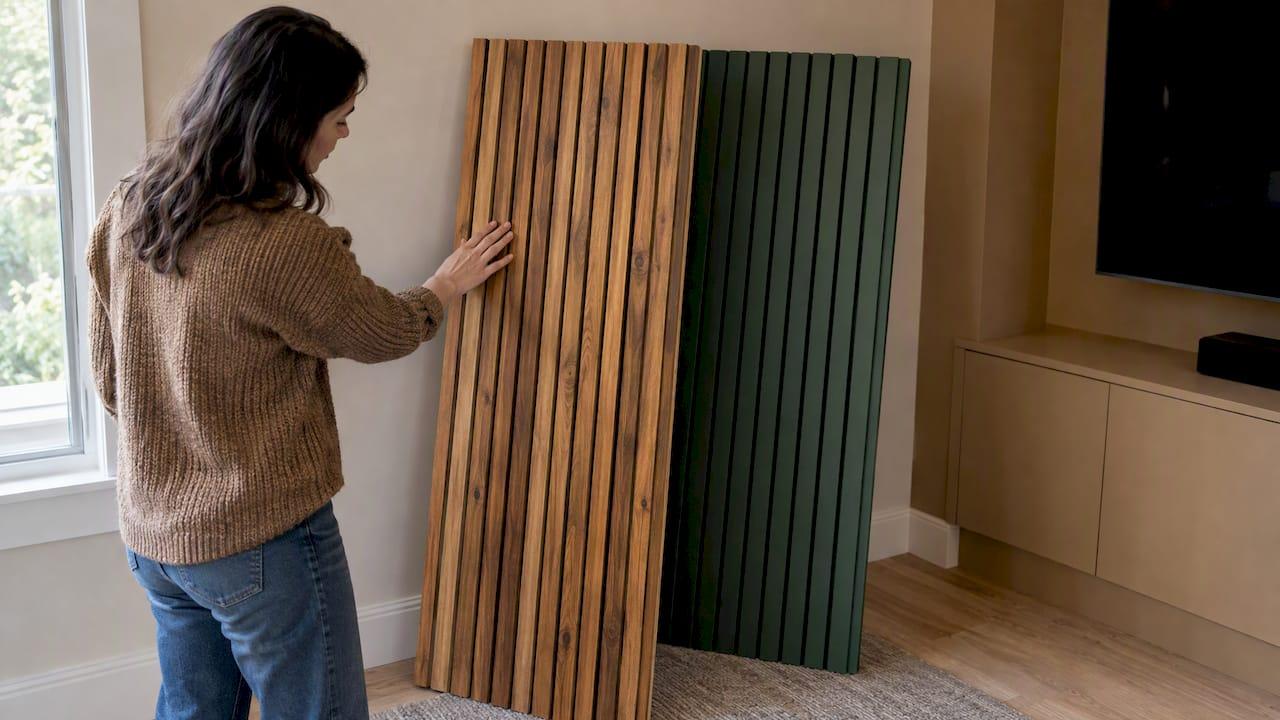
Choose stain if you want the grain and natural variation of the wood to show, and paint if you want a solid, uniform color that hides the grain. On a slat wall, that one choice sets the whole look of the room. It also decides how much prep you do, how the finish ages, and how you fix a scuff two years from now.
This guide walks through both finishes slat by slat: appearance, prep, application, durability, cost of upkeep, and the mistakes that cause most redo jobs. It leans on USDA Forest Products Laboratory and university extension guidance wherever the science matters.
TL;DR
- Stain soaks into the wood, keeps the grain visible and is simple to apply. Paint forms a film on top, gives a uniform color and hides grain.
- Solid-color (opaque) stain behaves much more like paint than like a transparent stain, so don't pick it if grain is the goal.
- Paint generally needs primer and more coats. Stain usually takes one or two thin coats.
- Under good conditions, paint is cited at 5 to 10 years and stain at 2 to 8 years, but indoors, scuffs and touch-ups matter more than weather.
- Finish slats before you mount them. It keeps the wall clean and the grooves covered.
Table of Contents
- Stain vs. paint: what actually differs
- How each finish changes the look of slats
- Prep and application: where the weekend goes
- Durability and upkeep
- Which finish suits which slat material
- Perspective: why we lean toward the finish you don't have to apply
- Getting the finish right: common mistakes
- Design pairings that make either finish look expensive
- Not sure which look is right? Plan it before you finish it
- FAQ
- Sources
Stain vs. paint: what actually differs
The two finishes work in opposite ways. According to the USDA Forest Products Laboratory's Wood Handbook, paint is a highly pigmented, film-forming finish that sits mainly on the surface. It offers the widest color selection and the most protection against weathering among wood finishes, and it obscures the grain. Stain, by contrast, soaks into the wood and preserves its natural texture, while paint builds a solid coating on top.
One caveat trips up a lot of buyers. The Wood Handbook points out that "solid-color" or opaque stain acts much more like paint than like a transparent or semitransparent penetrating stain. If you love the idea of seeing oak or walnut grain through the color, you need a transparent or semitransparent stain. A solid stain will bury it, much as paint does.
Here is the short version:
| Factor | Stain (transparent or semitransparent) | Paint |
|---|---|---|
| How it works | Penetrates the wood | Forms a film on the surface |
| Grain | Visible, with natural variation | Mostly hidden |
| Color range | Wood tones, some tinted colors | Virtually unlimited |
| Hides flaws | Poorly | Well |
| Prep | Light | More thorough, usually primer |
| Coats | One or two thin coats | Primer plus two topcoats |
| Failure mode | Fades | Chips, scratches, can peel |
| Touch-ups | Easy to reapply | Needs sanding and blending |
How each finish changes the look of slats
Slat walls are all about rhythm: repeating vertical lines, shadow gaps and texture. The finish either amplifies that texture or smooths it out.
Stain: warm, natural, a little unpredictable
Penetrating stain changes the tone of the slats while letting much of the grain and natural variation show through, according to the Wood Handbook. On a slat wall that reads as organic and warm. Slight differences from one slat to the next look intentional rather than sloppy.
This suits living rooms and media walls where you want a Scandinavian, mid-century or modern-rustic feel. Pairing stained slats with a dark TV, warm LED backlighting and a floating shelf creates depth without clutter. Purdue Extension notes that penetrating stains are especially appropriate for rough-sawn lumber because they accentuate texture and grain.
The tradeoff is that stain cannot cover much. Knots, patches, mismatched boards and old finish will all show through.
Paint: crisp, uniform, designed
Paint produces a more manufactured, consistent surface. If you want a matte black media wall that makes a TV disappear, a soft white slat wall for a bright room, or a deep green or navy statement wall, paint is the tool. It also lets you match the slats to existing walls or trim exactly.
Paint hides imperfections, which is why it is the better pick when the wood is uneven, has been patched, or is a budget species or panel you would not show off. The overall guidance from Sherwin-Williams is to choose paint for a complete color change or to hide significant damage, and stain for a natural look or wood in good condition.
If you are leaning toward white, our guide to building a luxury white slat wall with precut panels covers the design side in detail.
A quick decision by room style
- Warm and natural: transparent or semitransparent stain in a walnut, oak or smoked tone.
- Moody and dramatic: black or deep charcoal, either paint or a very dark stain if you still want some grain.
- Bright and airy: white or soft neutral paint.
- Matching existing cabinetry: whichever finish the cabinetry uses, tested on a spare slat first.
Prep and application: where the weekend goes
The biggest practical difference is effort. The USDA's Paint, Stain, Varnish, or Preservative? It's Your Choice notes that paint may require power-washing or sanding and primer, while penetrating stains can be applied to weathered surfaces without that preparation. That guidance is written about exterior wood, but the principle carries inside: paint needs a sound, clean, properly primed surface, and stain is more forgiving.
Staining slats
- Sand lightly with fine paper (about 150 to 220 grit) to open the surface and remove mill glaze or pencil marks.
- Wipe off dust with a damp cloth or tack cloth.
- Test on a spare slat or the back of one. Color on a scrap tells you more than a chip on a can.
- Apply one or two thin coats with a brush, rag or foam applicator, following the grain. Sherwin-Williams describes staining as typically easy, with no prep work and one or two thin coats.
- Let it cure fully before handling, then add a clear protective topcoat if the product calls for one.
Stain on bare wood is also the more reversible-looking option in daily life: it fades gradually rather than chipping.
Painting slats
- Clean and sand to dull any gloss. Fill nicks and defects.
- Prime. Painting takes more patience, and some projects need primer, according to the same Sherwin-Williams guidance. Primer also seals tannins and stops knots and uneven absorption from showing.
- Apply two topcoats with thin, even coats rather than one heavy one. For exterior siding and trim, the USDA gives an optimum thickness of 4 to 5 mils for primer plus two topcoats. A similar approach of primer and two thin coats works for interior slats.
- Choose your base. Latex paints and stains are water-borne, while oil or alkyd paints are solvent-borne, and latex is easier to clean up with water. For most home projects, that makes water-based paint the practical choice.
- Sand lightly between coats for a smooth feel.
For a large run of narrow slats, a small foam roller plus a brush for edges works well. If you are painting many pieces, a sprayer can speed things up, and one painting guide notes that spraying can make latticework easier while stains are commonly brushed on. Spraying indoors means masking everything and ventilating well.
Finish before you mount
Paint or stain the slats before attaching them. Resene's guidance on battens and slats recommends finishing battens before attaching them to avoid splashes on the wall, then filling and touching up nail or screw holes afterward. On a media wall, this also means you can finish the slats on sawhorses in the garage instead of reaching into narrow gaps.
A practical sequence for a weekend project:
- Friday evening: sand, prime or pre-stain test, first coats.
- Saturday: second coats, dry overnight in a ventilated space.
- Sunday: mount, fill holes, touch up, install the TV and lighting.
For wiring, stud layout and safe TV mounting on a slat wall, see our wood slat TV wall guide.
If you are changing finishes
Switching from one finish to the other on previously finished wood usually means stripping the existing finish. Stain will not take well over paint or sealer. Paint can go over sanded stained wood after primer, but a glossy topcoat has to be scuff-sanded first. Decide before you start, because reversing the choice later is real work.

Durability and upkeep
Most of the online comparisons for this question are about decks and fences, where sun, rain and foot traffic dominate. A slat wall indoors lives a gentler life, so use those numbers as a ceiling on wear, not a forecast.
For reference, Sherwin-Williams says that in optimal conditions paint lasts 5 to 10 years and stain 2 to 8 years. Paint is more susceptible to chips and scratches, while stain fades but does not peel. For an outdoor fence, Lowe's guidance puts restaining at every two or three years and repainting every three to five.
What fails indoors
Indoors the enemies are different. Resene notes that interior wood accents need protection from scuffs, knocks and dust, and are often finished with the same paint used on walls or joinery. Think vacuum heads, kids, pets, furniture backs and the occasional cable tug.
- Painted slats can chip at edges and corners, where the film is thinnest. Keep a small jar of the exact color and a fine brush for touch-ups. A semi-gloss or satin sheen cleans more easily than flat.
- Stained slats hide minor scuffs better because the color lives in the wood, and reapplying is simple. A clear topcoat adds wipe-clean protection.
Moisture and peeling
Purdue Extension states that penetrating stains are porous and generally do not blister or peel when moisture enters the wood, whereas paint forms a surface film that can blister or peel if the wood becomes wet. Inside a dry living room this rarely matters. In a bathroom, a basement, a mudroom or a covered porch, it matters a lot. For humid spaces, take extra care with sealing all faces of every slat, including the back and ends.
The Wood Handbook adds a useful reality check: paint is not a preservative and will not prevent decay in wood that stays damp. Fix the moisture source first, and finish second.
If you want to see how finish choices compare on lifespan and wear in another category of interior woodwork, this look at painted versus wrapped finishes shows the same logic: surface films look uniform but need touch-ups where they take knocks.

Reapplication: the real long-term cost
The USDA's finishing guidance describes paint as protecting wood from UV and erosion, while penetrating stains allow moisture to escape and are easy to reapply. Indoors, away from sun, you may go many years before a refresh. When you do, a stained wall generally needs a light sand and a fresh coat, while a painted wall needs scuff-sanding, spot-priming damaged areas and recoating to blend. Our post on wall panels versus paint takes the lifetime-cost comparison further.
Which finish suits which slat material
The substrate matters as much as the look.
- Solid wood, rough or textured: stain accentuates texture and grain. Purdue Extension says stains work well on rough lumber and plywood, and also perform satisfactorily on smooth surfaces, while paint performs best on smooth, edge-grained lumber such as redwood or cedar.
- Smooth pine or poplar: takes paint beautifully, and gives a clean look once primed. Pine can blotch with stain, so use a pre-stain conditioner.
- Plywood: stain shows the laminated grain, and paint hides it. Both work, but edges need filling or edge banding for a clean paint finish.
- MDF: designed for paint, not stain. It has no grain to show, and it soaks up moisture at cut edges, so prime edges well.
- Pre-finished panels: if you would rather skip finishing altogether, a slat panel that already has its color applied removes the whole question.
The label on a stain can be misleading, so read it for the words transparent, semitransparent or solid. For a media wall where the grain is the point, you want one of the first two.
Perspective: why we lean toward the finish you don't have to apply
We have watched a lot of slat projects go wrong at the finishing stage, not the building stage. The panels go up straight, the wiring is clean, and then a rushed second coat or a blotchy stain job makes the wall look like a weekend experiment instead of a designed room.
That is why our approach is to make the rest of the job as predictable as possible. Our kits are pre-cut and pre-labeled, with hidden wire management and a modular system, so the only decisions left are the ones that shape the look. Our acoustic slat panels come in colors such as black, smoked walnut, sandstone and red walnut, so many homeowners can choose the color they want up front instead of finishing it themselves.
If you do finish slats yourself, our advice is simple: pick the look first, test on a spare piece, finish before mounting, and do not rush the cure. Stain if you want the wood to speak. Paint if you want a designed, uniform backdrop for the TV. Either way, a media wall should look high-end without a contractor's invoice.
Jake
Getting the finish right: common mistakes
- Skipping the test piece. The same stain looks different on oak, pine and plywood. Test on the species you are actually using.
- Painting without primer. It saves an hour and costs you a repaint. Knots and uneven absorption telegraph through.
- Using a solid stain and expecting grain. It will look closer to paint.
- Finishing after mounting. You will get splashes on the wall, and drips in the grooves.
- Heavy coats. Thin coats cure harder and look smoother, for both stain and paint.
- Forgetting holes. Fill and touch up screw or nail holes once the slats are up, as Resene recommends in its batten guidance.
- Ignoring ventilation. Oil-based products in particular need good airflow. Read the can.
If your slats will sit near a fireplace or heat source, check the finish manufacturer's guidance on heat and clearances, and follow the fireplace manufacturer's required distances.
Design pairings that make either finish look expensive
The finish is only part of the wall. A few combinations consistently work:
- Stained walnut slats with warm LED strips: the light rakes across the grain and adds depth.
- Black painted slats with a linear electric fireplace: a dramatic, cinematic look that makes the TV recede.
- White painted slats with light oak floating shelves: bright and clean, with contrast from the shelf wood.
- Natural oak stain with brass or matte black hardware: warm wood plus a metal accent ties the room together.
If you need ideas, browse our accent wall ideas for a stylish 2026 home, or see how hardware finishes in brass, chrome and matte black change the character of a wall.
Not sure which look is right? Plan it before you finish it
If you are torn between a stained and a painted slat wall, seeing it designed first can save a costly redo. We offer design help for media walls: a Single Concept Design is $99, a 3 Concepts + Revision Design Package is $199, and a Full Design & Quote is $299, all one-off. You can see them on our design services page.

If you would rather skip finishing and mounting altogether, we also offer white-glove installation for projects in the San Francisco Bay Area. Details are on our media wall kits page. For a ready-to-hang look, start with our smoked walnut acoustic slat panel or the black version.
FAQ
Is stain or paint better for wood slats?
Neither wins in every room. Stain is better when the wood is in good condition and you want grain and natural variation to show. Paint is better when you want a uniform color, need to hide flaws, or want a bold or white finish. Match the finish to the look you want first, then to the material.
Does stain last longer than paint?
Usually the reverse. Sherwin-Williams cites paint at 5 to 10 years and stain at 2 to 8 years in optimal conditions. But the failure modes differ: paint chips and scratches, while stain fades. Indoors, away from sun and rain, both can last well beyond those figures, so scuffs and touch-ups are the practical concern.
Can I paint over stained slats?
Yes, in most cases. Sand the surface to dull it, clean off dust, and apply a primer before your topcoats. Going the other direction, from paint to stain, usually means stripping the existing finish first, because stain needs bare wood to soak in.
Should I finish slats before or after mounting?
Before. Finishing slats before attaching them keeps splashes off the wall and lets you cover every face and edge evenly. After mounting, just fill the screw or nail holes and touch them up with a small brush.
Is solid stain the same as paint?
Not exactly, but close. The USDA Wood Handbook notes that solid-color or opaque stain behaves much more like paint than like a transparent or semitransparent penetrating stain. It still is formulated differently, yet it covers grain much as paint does. Choose transparent or semitransparent stain to keep the grain visible.
Sources
- Wood Handbook, Chapter 15: Finishing of Wood (USDA Forest Products Laboratory)
- Paint, Stain, Varnish, or Preservative? It's Your Choice (USDA)
- NCR-135 (Purdue Extension)
- When to Stain vs. Paint Wood (Sherwin-Williams)
- The Best Way to Stain or Paint a Fence (Lowe's)
- Using battens and wooden slats (Resene)
- Best Way to Paint Lattice
- Wrapped vs Painted Doors: Which Finish Lasts Longer?