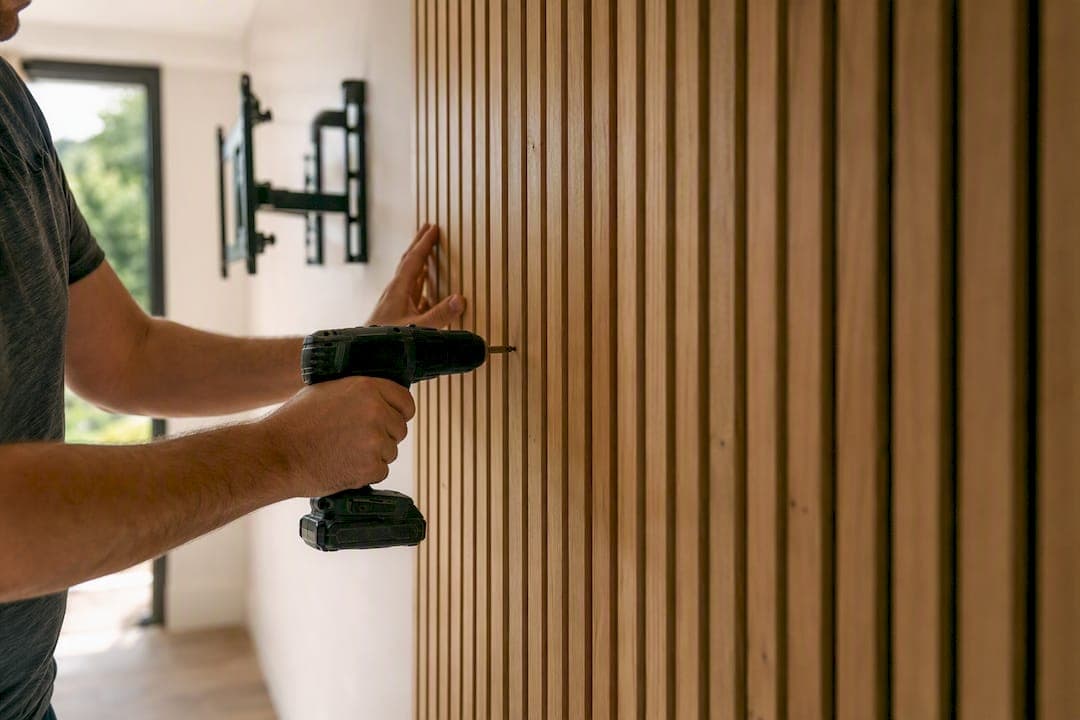
For most homeowners, a felt-backed prefab acoustic panel system is the smartest way to build a wood slat TV wall, since it delivers real sound benefit, hides cable runs, and installs in a weekend. A solid wood slat build over a plywood substrate is the better call if you want total control over species and finish. Either way, anchor the TV bracket to studs, not the decorative slats, and plan your cable path before you cut a single board. Hire a pro for masonry walls, in-wall power, or anything larger than a 75-inch screen.
TL;DR:
- Prefab acoustic panels offer a quick, sound-absorbing solution with built-in cable routing, suitable for walls up to 8 feet wide.
- Full-height wood slat walls, especially in Japandi or modern minimal styles, must be proportioned carefully to avoid looking unintentional or unfinished.
- Mounting a TV on a slat wall requires anchoring brackets directly to studs or a plywood surface, not the decorative slats or felt backing.
- Widths of slats typically range from 2.5 to 3.5 inches, with half-inch gaps creating shadow lines, and lighting angles significantly impact depth perception.
- Budget considerations vary from affordable prefab kits to high-cost custom renovations, with prefab systems providing a close-to-custom look in a weekend.
Table of Contents
- What Style of Wood Slat TV Wall Fits Your Room?
- Which Wood Slat Panels Should You Buy?
- Can You Hang a TV on a Slat Wall Safely?
- How Wide Should the Slats and Gaps Be?
- How Do You Hide Wires and Improve Sound?
- Should You Buy a Prefab Kit, Build DIY, or Renovate?
- What Should You Budget for a Wood Slat TV Wall?
- How Do You Keep a Wood Slat Wall Looking New?
- How Do Speakers and Sound Systems Work With a Slat Wall?
- Is Sustainably Sourced Wood Worth Looking For?
- An Editor's Take on What Actually Makes a Slat Wall Work
- Get a Custom Look Without the Custom Timeline
- Where to Learn More Before You Buy
- Sources
- FAQ
What Style of Wood Slat TV Wall Fits Your Room?
The style decision matters more than most people think, because a wood slat media wall is really a piece of furniture built into your wall. Get the proportions wrong and even beautiful lumber looks like an afterthought.
Floor-to-ceiling coverage reads as intentional, architectural, and expensive, even when the materials cost less than you'd guess. A design guide focused on Japandi slatted walls makes this point directly: full-height panels turn the TV into part of a composition instead of an appliance bolted to drywall. Partial panels, by contrast, need a frame, a change in wall color, or a ceiling detail to justify the stop point. Without that framing, they look like someone ran out of material.
Japandi and modern minimal are the two directions that dominate slat wall projects right now, and they split on wood tone more than anything else.
- Japandi leans on white oak, ash, or lightly stained poplar. Warm, low-contrast wood against a soft white or greige wall reads calm rather than busy, which is the whole point of the style.
- Modern minimal tends toward walnut or a dark stain, often paired with a matte black background between the slats. That black substrate is the trick most people miss.
A matte black backing behind the slats creates real shadow depth between each piece of wood, and it also helps the TV disappear visually when the screen is off. The same Japandi design guide recommends this pairing specifically because the contrast reads as intentional shadow lines rather than gaps you forgot to finish. Painted MDF slats work here too, especially if you want a uniform look without grain variation, and they're the easiest surface to touch up later.
Finishing details separate a good slat wall from a great one. A floating shelf below the TV, a low-profile console instead of a bulky media cabinet, and a deliberate three-object styling vignette (a plant, a sculptural object, a stack of books) do more for the finished look than another coat of stain ever will. Resist the urge to fill every shelf. Slat walls read best when the surrounding styling is quiet and the wood does the talking.
If your living room already leans traditional, with crown molding and warmer paint tones, a partial slat panel framed like a piece of art tends to blend better than a floor-to-ceiling commitment. Save the full wall treatment for rooms where the TV wall is the visual anchor of the space.
Which Wood Slat Panels Should You Buy?
Three material categories cover almost every wood slat tv wall project, and they solve different problems.
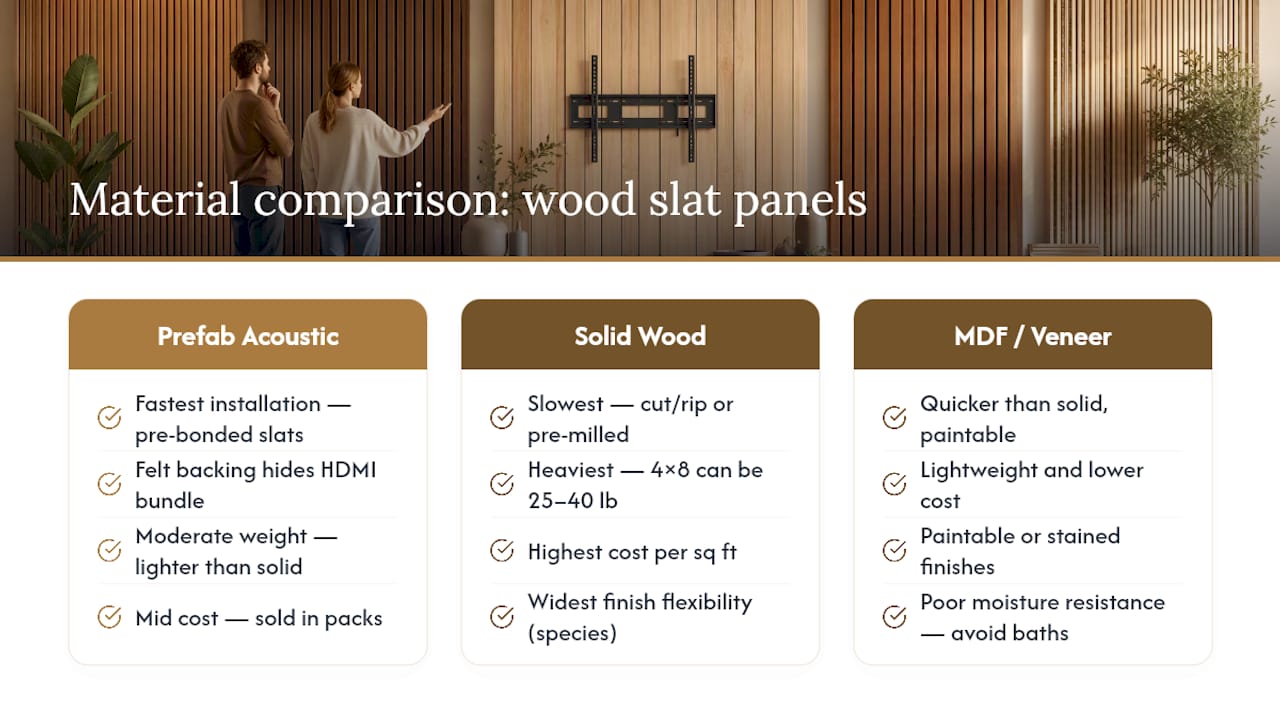
Prefab acoustic slat panels are the fastest route to a finished look. They arrive with slats pre-bonded to a felt backing, usually in fixed-width sections you screw or clip directly to the wall. The felt does double duty: it absorbs sound reflections and gives you a soft surface to route cables behind. Acoustic panel installation guides note that these panels also add enough depth behind the slats to hide an HDMI bundle without a separate channel. Marketplace listings for wood slat wall paneling behind TVs show these typically sold in packs sized for an average wall width, so measure twice before ordering.
Solid wood slats give you the most authentic grain and the widest finish flexibility, but they cost more per square foot and weigh noticeably more once mounted. If you want a specific species, like rift-cut white oak or walnut with a hand-rubbed oil finish, solid slats are the only way to get it. Expect to rip your own boards to width unless you buy pre-milled slat stock, which adds labor time most DIYers underestimate.
MDF or veneer slats split the difference. Paintable, lighter, and cheaper than solid hardwood, they're the practical choice for a modern minimal look with a painted or black-stained finish. The tradeoff is durability. MDF doesn't handle moisture well, so keep it away from bathrooms or exterior walls prone to condensation.
Pro Tip: Check the panel's total depth on the product page before you order, not just the slat width. A panel with only 3/4 inch of depth behind the slats won't leave room for a standard HDMI coupler, and you'll be forced into a slimmer, harder-to-source cable.
Weight matters more than most first-time buyers expect. A single 4-foot by 8-foot section of solid walnut slats can run 25 to 40 pounds depending on density, and that weight needs to land on studs or blocking, not drywall anchors. If you're covering a full wall, plan on adding horizontal blocking behind the panel line even where a stud doesn't naturally fall, especially near the TV mounting zone.
Custom fabricators also combine slat panels with built-in cabinetry, which is worth knowing about even if you're not ready for that scope. A built-in storage and slat wall build shows how the two elements work together structurally, since the cabinet framing often becomes the mounting substrate for the slats above it. For quick sourcing outside a prefab kit, independent sellers of vertical wood slat panels also offer cut-to-size options if your wall dimensions don't match standard pack sizes.
Can You Hang a TV on a Slat Wall Safely?
Yes, but never let the TV's weight rest on the slats or the felt backing alone. The decorative layer is not structural, and every credible mounting guide agrees on one rule: the bracket has to reach the studs or a substrate anchored to the studs behind the panels.
You have two solid ways to do this correctly.
- Mount the bracket first, then build around it. Locate your studs, install the TV mounting plate directly to the wall at your target height, then cut or notch the slat panels to fit around the exposed bracket. This method guarantees a rock-solid connection to the studs but requires precise measuring before you cut a single panel, since mistakes are hard to hide once the wood is up.
- Install the panels first, then cut an access opening. Build your full slat wall, then cut a clean rectangular opening where the bracket needs to go and screw the mounting plate through the panel into the studs behind it. This approach lets you finalize your slat layout and lighting before committing to exact TV placement, which is useful if you're still deciding on screen size.
For most 40 to 65-inch TVs, a standard stud-mounted bracket rated for the screen's weight is enough, as long as you hit at least two studs. Larger screens, from 75 to 85 inches, need a bracket engaging three or more studs or a horizontal blocking board that spans several studs and distributes the load. A 3/4-inch plywood substrate anchored across the TV zone is the safest fallback when your studs don't line up conveniently with where the TV needs to hang, since it transfers all the weight to the wall framing instead of the decorative slats.
Locating studs is simple with a basic stud finder, but confirm with a small test hole before drilling your final mounting holes, especially in older homes where framing spacing can be inconsistent. Use lag bolts or the fasteners specified by your bracket manufacturer, never drywall anchors, for anything heavier than a small monitor.
Pro Tip: Never trust a bracket's weight rating without checking that it also lists the stud spacing it assumes. A bracket rated for 100 pounds still fails if it's only engaging one stud instead of the two or three the rating assumes.
Verify your setup two ways: check the TV manufacturer's VESA mounting spec against your bracket, and confirm the bracket's stud engagement matches what the manufacturer recommends for your TV's weight class. If your wall is masonry, brick veneer, or you're not sure what's behind the drywall, or you're planning to run in-wall power for a cleaner look, that's the point to call an electrician or a mounting professional instead of guessing.
How Wide Should the Slats and Gaps Be?
Slat and gap dimensions decide whether your wall looks custom or homemade. There's more room for personal taste here than in the mounting section, but a few rules of thumb hold up across most rooms.
- Slat width: 2.5 to 3.5 inches is the sweet spot for most living rooms. Narrower slats read more delicate and detailed; wider slats feel bolder and cover a wall faster with fewer pieces.
- Gap width: Roughly 13 to 15 millimeters, or about half an inch, is the range that creates visible shadow lines without the wall looking like a fence. Tighter gaps disappear into a solid-looking surface; wider gaps start to look like separate boards rather than one continuous panel.
- TV center height: Aim for the screen's vertical center around 42 to 48 inches off the floor, measured to match seated eye level on your main sofa, not a generic standard.
Lighting changes how those shadow lines read more than the gap width itself. LED strips placed in a halo behind the panel, or recessed into a shelf above the TV, throw light at an angle that deepens the shadow between each slat rather than washing it flat. Angle the light source slightly off-perpendicular from the wall for the strongest effect. Straight-on lighting kills the depth you built the gaps for in the first place.
Composition still matters beyond the numbers. A console or floating shelf sits best around 16 to 20 inches below the screen's bottom edge, leaving enough breathing room that the TV doesn't feel crowded. If your slat panel is narrower than the full wall, consider running a thinner strip of the same slats onto an adjacent wall or ceiling detail. That continuation is what makes a partial installation feel deliberate instead of clipped short.
Pro Tip: Dry-fit your slat spacing with painter's tape on the wall before cutting anything. A few minutes with tape and a tape measure catches proportion problems that are expensive to fix once the wood is up.
How Do You Hide Wires and Improve Sound?
Cable management makes or breaks the finished look of a wood slat tv wall, and you have options that don't require an electrician.
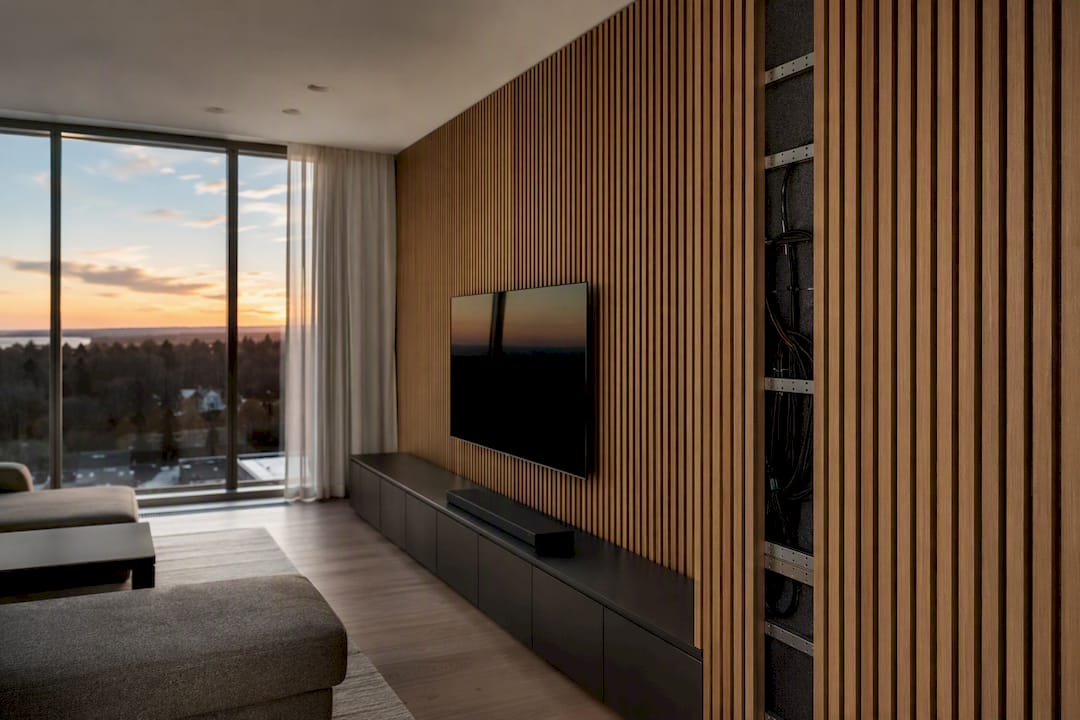
The felt backing on prefab acoustic panels gives you a built-in cavity for routing an HDMI cable, a power cord, and a coax line without any extra hardware, as long as the panel depth accommodates your connector sizes. For thicker cable bundles, look for panels with slim routing channels molded into the felt, or add a shallow blocking strip behind the panel line to create more depth. A guide to hiding wires without cutting walls covers several non-invasive approaches that work well behind slat panels specifically, including cord covers and low-profile raceways for setups where you're not ready to open the drywall.
In-wall power and data outlets are worth the electrician's fee when you want a completely cordless look at the TV location, or when you're already opening the wall for blocking anyway. Running a new outlet behind the panel line, positioned to land in your final access cutout, saves you from ever seeing a power cord again. It's not a step most DIYers need for a basic install, but it's the detail that separates a good slat wall from a flawless one.
Acoustic performance is the underrated benefit of felt-backed panels. Sound guides on acoustic slat wall installations point out that the felt layer absorbs mid-range reflections that otherwise bounce off a flat drywall surface, which noticeably improves dialogue clarity from a TV or soundbar. If you're pairing the wall with a soundbar or floating speakers, mount the soundbar low enough that the felt panel directly behind it is doing the acoustic work, not an exposed section of drywall above the TV.
Leave a few inches of clearance behind any enclosed console area for ventilation if you're housing a receiver, game console, or streaming box back there. Electronics generate heat, and a sealed cavity behind solid wood slats traps it.
Should You Buy a Prefab Kit, Build DIY, or Renovate?
Your budget, timeline, and tolerance for tool work should decide this, more than which look you prefer, since all three routes can hit the same finished style.
Prefab kits suit homeowners who want a high-end result on a weekend timeline without owning a table saw. Pre-cut, pre-labeled panels mean you're assembling a system, not fabricating one, and most installs run one to two days including the TV mount and any lighting hookup. This is the right call if you value your Saturday and want the finished wall to look custom without the custom-build price tag.
DIY solid slat builds fit homeowners with some woodworking comfort who want full control over species, stain, and exact spacing. Expect a longer timeline, typically a full weekend to a week depending on wall size, plus tools you may need to rent or buy: a miter saw, a jigsaw for outlet cutouts, a stud finder, and clamps for glue-up if you're building your own panels from raw boards.
Full renovation with built-in cabinetry is the route for homeowners who want integrated storage, concealed wiring throughout, and a completely custom footprint. It typically involves a contractor or custom fabricator, a multi-week timeline, and a materials-plus-labor cost well above either of the first two options. Built-in media wall projects show what this looks like when slat panels are combined with cabinetry, and it's worth studying even if you ultimately choose a simpler path, since the storage planning lessons apply at any scale.
Themediawallstore built its kit business around the gap between DIY and renovation: homeowners who want the renovation-level finish without the renovation-level timeline or price. Every kit ships pre-cut and pre-labeled, so the guesswork of measuring, cutting, and dry-fitting panels is already done before the box arrives. Over 1,000 customers have used these kits to finish a living room wall in a weekend, backed by expert support if a step doesn't go as planned and a risk-free return policy if the finished look isn't right for the room.
A slat wall only looks intentional when the proportions, the wire management, and the mounting are all handled correctly the first time. Pre-cut, pre-labeled panels remove the single biggest source of DIY slat wall mistakes: cutting boards to the wrong width and running out of material halfway through the wall.
Homeowners who've compared quotes for a full custom build against a kit consistently find the gap in finished quality is smaller than the gap in price and time. That's the trade a prefab system is built to solve.
What Should You Budget for a Wood Slat TV Wall?
Costs vary widely by material choice and wall size, but rough ranges help you plan before you start shopping.
- Prefab acoustic panel kits: Generally the most predictable cost, since pricing is per panel or per full-wall kit rather than an open-ended materials list. Install typically runs one to two days for a DIYer working solo, most of it spent on layout and the TV mount.
- DIY solid wood slat builds: Materials alone can run higher than a prefab kit once you account for lumber, stain, felt or acoustic backing if you're adding it yourself, and blocking. Timeline stretches to a full weekend or more, especially if you're milling your own slats from rough lumber.
- Full renovation with cabinetry: The highest cost tier, driven by custom fabrication and installation labor, with timelines running one to several weeks depending on scope and whether an electrician is involved for in-wall power.
Extras that catch people off guard: an electrician for in-wall power or data (budget this separately if you want it), plywood blocking for heavier TVs, LED lighting kits and their transformers, and any cabinetry or floating shelf additions. Schedule creep usually comes from one of two sources: discovering studs don't line up where you need the TV mount, or realizing mid-project that you want in-wall power after the wall is already partially finished.
A few savings moves are worth knowing. Poplar with a walnut-toned stain gets you close to the look of real walnut at a fraction of the cost. Framing a partial panel instead of covering floor-to-ceiling cuts material costs significantly while still reading as intentional if the framing is clean. And MDF slats with a painted matte black finish deliver the modern minimal look without the price of solid hardwood.
How Do You Keep a Wood Slat Wall Looking New?
Wood slat walls are lower maintenance than most people expect, but a few habits keep the finish looking sharp for years.
Dust weekly with a soft microfiber cloth or a vacuum brush attachment, working in the direction of the slats rather than across them. Gaps between slats collect dust faster than a flat wall does, simply because there's more surface area and more corners for it to settle into. A can of compressed air or a narrow vacuum nozzle clears buildup in the gaps without scratching the finish.
Avoid harsh chemical cleaners on stained or oiled wood slats. A damp cloth with a small amount of mild soap handles most grime, and a wood-specific cleaner or conditioning oil once or twice a year keeps solid wood slats from drying out, especially in homes with forced-air heating that pulls humidity from the air in winter.
Painted MDF or veneer slats hold up fine with an occasional wipe down but touch up scuffs quickly with matching paint before they become obvious. Unlike solid wood, MDF doesn't sand and refinish well, so prevention matters more than repair.
Watch felt-backed acoustic panels for dust accumulation in the felt itself, which can dull sound absorption over time. A vacuum brush attachment on low suction clears this without damaging the felt. Keep panels away from direct, prolonged sun exposure where possible, since UV can fade stained wood unevenly over years, particularly noticeable on a floor-to-ceiling wall where one section gets more light than another.
How Do Speakers and Sound Systems Work With a Slat Wall?
A wood slat wall is one of the few TV wall styles that actively helps your sound system instead of just decorating around it. The felt backing behind acoustic slat panels absorbs mid-range sound reflections that would otherwise bounce off a flat wall and muddy dialogue clarity, which matters most for soundbars and center-channel speakers mounted directly below or behind the TV.
If you're running a soundbar, mount it at a height where the acoustic panel sits directly behind it, not an exposed strip of drywall above or below the panel line. That placement puts the sound-absorbing material exactly where the speaker's output hits the wall first.
For a full surround setup, floating shelves built into the slat wall design can house front or center speakers without needing separate stands, as long as you've planned the shelf depth and weight capacity during the design phase rather than adding it afterward. Bookshelf speakers on floating shelves benefit from the same absorption the felt backing provides, reducing the boxy echo that flat walls tend to introduce.
Wireless speaker systems and in-ceiling setups sidestep the wiring question entirely, which is worth considering if running speaker wire through a finished slat wall sounds like more trouble than it's worth. Whatever system you choose, leave access room behind the panel for a receiver or amp if it's living in a console below the TV, since heat and ventilation matter more with active electronics than with a passive shelf display.
Is Sustainably Sourced Wood Worth Looking For?
Sourcing matters more on a slat wall than on most furniture, simply because of how much visible wood a full installation uses. A floor-to-ceiling wall can consume more linear feet of lumber than an entire dining set, so the sourcing question is worth a few extra minutes of research before you buy.
Look for lumber or prefab panels carrying FSC (Forest Stewardship Council) certification, which verifies the wood came from responsibly managed forests rather than unregulated logging. Domestic species like white oak, poplar, and walnut generally travel shorter distances to reach a US supplier than imported exotic hardwoods, which cuts down on the shipping footprint tied to the material.
Reclaimed or salvaged wood is another route worth considering if you like the idea of a slat wall with visible character and history rather than uniform, freshly milled boards. It won't give you the clean, consistent look that Japandi or modern minimal styles typically call for, but it's a strong option if your room leans more rustic or eclectic.
Engineered options, like veneer over an MDF or plywood core, use less solid hardwood per square foot of finished wall than an all-solid-wood build, which is a reasonable middle ground if sustainability is a priority but you still want a wood-grain look at scale.
An Editor's Take on What Actually Makes a Slat Wall Work
Most people obsess over wood species and finish color before they've thought through spacing, and that's backwards. A mediocre wood choice with disciplined, consistent gap widths looks more expensive than premium walnut installed with sloppy spacing. The eye reads rhythm before it reads material.
The biggest pitfall isn't a mounting failure. It's homeowners who commit to a full wall design, then discover halfway through that their console height, their lighting plan, and their cable routing were never actually decided before the first slat went up. Every strong slat wall project answers those three questions on paper before any wood gets cut.
What kits solve well isn't just the labor. It's the decision fatigue. A pre-cut, pre-labeled system already made the spacing and proportion calls that trip up first-time DIYers, which is exactly where most homeowner projects go sideways.
— Jake
Get a Custom Look Without the Custom Timeline
Themediawallstore's DIY media wall kits are built for exactly the outcome this article walks through: a slat wall that looks like it came from a custom fabricator, minus the weeks of lead time and the contractor invoice. Every kit arrives pre-cut and pre-labeled, with felt-backed acoustic panels, optional LED lighting, and hidden wire management already planned into the design, so the layout decisions that trip up most DIY builds are handled before the box reaches your door.

Kits come in multiple finishes, from smoked walnut to matte black, and pair with floating cabinetry or a fireplace insert if you want the full media wall experience rather than just the slat backdrop. Homeowners who've compared quotes against a full custom renovation consistently find the finish quality closer than expected, at a fraction of the price and a weekend instead of weeks. Support is available if a step in the install doesn't go as planned, and every kit comes with a risk-free return if the look isn't right once it's on the wall.
Browse the current lineup in the DIY media wall kit shop, or start with a single acoustic slat panel in Red Walnut if you want to test a finish on one section of wall before committing to the full room.
Where to Learn More Before You Buy
For the design and spacing numbers referenced throughout this guide, the Japandi slatted wood TV wall design guide covers gap widths, substrate color, and species pairing in more depth than fits here. For the acoustic side of the equation, the acoustic panel TV wall build guide explains panel counts and mounting depth for different wall widths.
If a full renovation with built-in cabinetry is on your radar, Ambi Woodwork's media wall projects show what integrated storage looks like in practice. For broader interior pairing ideas beyond the TV wall itself, current interior design trends offer useful context on finishes and door styles that complement a slat feature wall. And when you're ready to shop, the DIY media wall kit shop is the direct source for pre-cut panels and full kits.
Sources
- The Japandi Slatted Wood TV Wall: The Complete 2026 Design Guide
- Acoustic Panel TV Wall: Build a Modern Feature Wall
- Media Wall with Slat Wall and Built-In Storage | Ambi Woodwork
- Wood Slat Wall Paneling Tv Backdrop
FAQ
Can You Hang a TV on a Slat Wall?
Yes, as long as the TV bracket is anchored to wall studs or a plywood substrate behind the slats, never to the decorative panels or felt backing alone.
Are Wood Slat Walls Dated?
No. Slat walls have moved from a niche accent trend into a mainstream feature for modern minimal and Japandi-style living rooms, and the floor-to-ceiling versions in particular read as current and architectural rather than trendy.
What Are the Wooden Slats on Walls Called?
They're most commonly called slat wall panels or acoustic slat panels when they include a felt backing, though you'll also see them referred to as fluted panels or vertical slat panels depending on the retailer.
How Do You Mount a TV on Wood Slats?
Locate your studs first, then either mount the bracket directly to the studs before installing the panels around it, or install the panels first and cut a precise access opening to reach the studs behind them; both methods work as long as the bracket never relies on the slats for support.
How Much Does a Wood Slat TV Wall Cost?
Costs range from budget-friendly for a prefab acoustic panel kit covering a standard wall, up to significantly more for a full renovation with built-in cabinetry, with a DIY solid wood build typically landing in between depending on species and finish.
Do Wood Slat Walls Help With Sound?
Yes. Felt-backed acoustic slat panels absorb mid-range sound reflections that a flat drywall surface bounces back into the room, which improves dialogue clarity from TV speakers or a soundbar mounted in front of the panel.