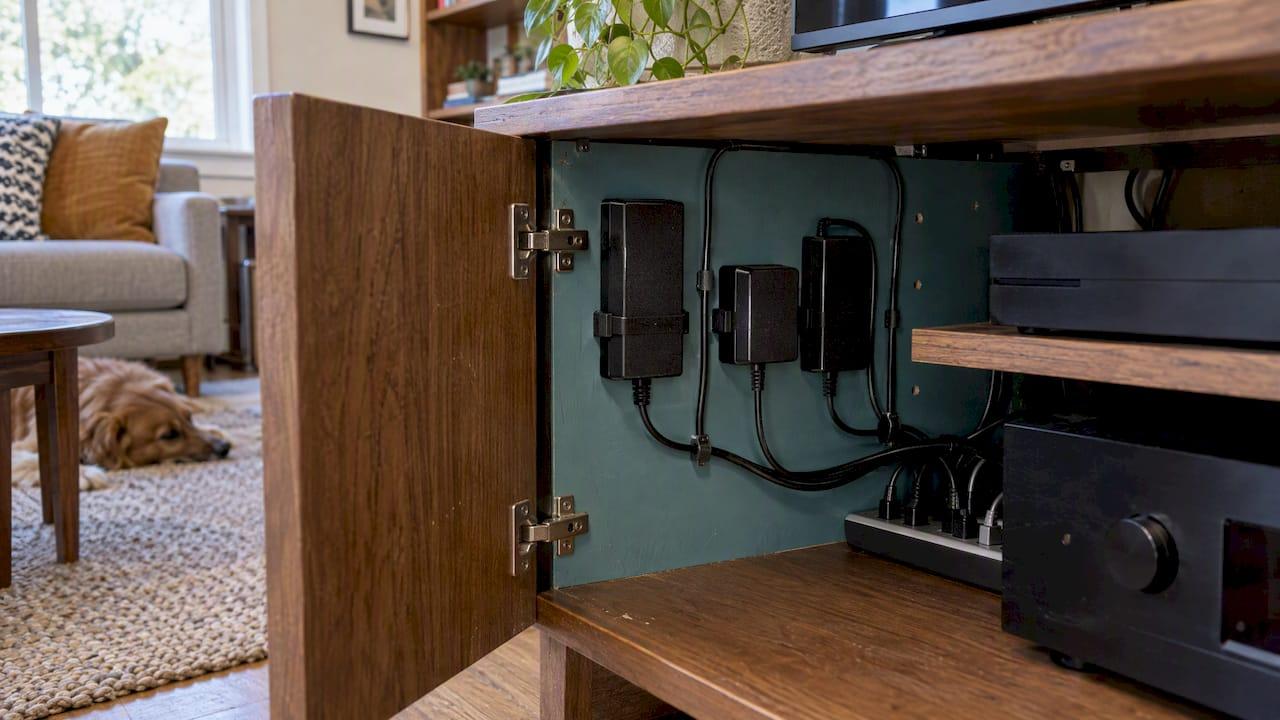
You can keep power bricks inside a cabinet safely if you do three things: fasten each brick so it hangs or sits off the cabinet floor, leave open airflow around it, and keep it reachable for later. Never seal a brick in a closed box. Everything below shows how to do that with a router, a streaming box, a mini PC or a laptop charger, and how to plan it before the cabinet is built.
TL;DR
- Mount bricks to the cabinet wall, back panel or underside of a shelf with a bracket, strap or hook. Don't let them pile up on the floor of the cabinet.
- Give each brick open air. Aim for 2 to 4 inches of free space above and around it, with slots, mesh or open panels.
- Route power and data cables separately, label both ends, and cross them at right angles when they must meet.
- Leave the bricks accessible. Don't bury them behind fixed panels where you can't swap a failed one.
- Stop using any brick or cord that feels hot, smokes, sparks or gives a tingle.
Table of Contents
- What a power brick is, and why it ends up in your cabinet
- Why power bricks get warm, and how warm is too warm
- Five ways to mount bricks in a cabinet
- Keep every brick serviceable
- Route and organize the cables
- Electrical safety inside the cabinet
- Perspective: plan the power zone first
- A cabinet layout that works
- Common mistakes to avoid
- Build the power zone into a media wall
- FAQ
- Sources
What a power brick is, and why it ends up in your cabinet
A power brick is the separate box on a device's power cord. Dictionaries describe it as a small but heavy rectangular AC to DC adapter that connects an electronic device, usually a laptop, to household current. Manufacturers use plainer names. Lenovo calls it an AC adapter, also known as a power adapter or charger, and says it converts alternating current from the wall into the direct current your devices use. CDW adds that because it converts AC to DC it may accurately be called an AC/DC converter, and that it is often called a charger when it powers a battery device.
A brick differs from a "wall wart", where the supply is built into the outlet plug. A brick sits partway along the cord, so it has to live somewhere. In a media cabinet that usually means a router, a mini PC, a soundbar, a game console dock, LED strip drivers and a handful of chargers, each with its own box and its own tangle.
The problem is real but small: bricks are bulky, they get warm, and they're ugly. The fix is to treat them like any other component. They need a place, a path for their cables and some air.
Why power bricks get warm, and how warm is too warm
A brick converts mains power into low-voltage DC, and the conversion is never perfect. Some energy leaves as heat. That's normal. What turns normal into a problem is a closed space where the heat has nowhere to go.
Two pieces of guidance are worth using together:
- Bricks rely on convection, so aim for 2 to 4 inches of free airspace above and around them. Use open panels, slots or mesh rather than solid boards.
- Run a simple test. After a 30-minute heavy charging session, check the temperature. If it climbs more than 15 degrees Fahrenheit, open more slats or add a passive ventilation slot.
The Electrical Safety Foundation International (ESFI) makes the same point from a safety angle: entertainment centers and workstations need enough space around equipment for proper ventilation. Never fully enclose heat-producing devices such as power bricks.
If your TV or console shares the cabinet, the ventilation question is bigger than the bricks. Our guide to TV ventilation in a cabinet covers fixes that actually stop overheating, and the piece on planning AV ventilation before the finish goes on explains quiet thermostatic fans for tighter builds.
Five ways to mount bricks in a cabinet
The goal is the same in every method: the brick is held in place, off the floor, with air on most sides. Here are the options, from simplest to most permanent.
1. Brick mounting brackets
A bracket screws to the inside wall of the cabinet and grips the brick. One universal power supply mount for cabinet walls ships with a strap and wood screws, which is typical of the category. Check that the strap fits your brick's width before you buy, and pick a spot where the brick's cord reaches both its outlet and its device without strain.
2. Hook and hang
One long-standing forum approach is to put hooks in the top of the cabinet and hang bricks by their own cords, which keeps air moving evenly around each one. It works best for light bricks with sturdy cords. Heavy bricks tug on their connectors, so use a bracket for those.
3. Velcro or zip ties to a rail
Secure bricks with Velcro or zip ties so they never rest directly on the drawer bottom, where heat builds up. Reusable hook-and-loop straps beat zip ties for anything you'll want to change later, because you can adjust them without cutting.
4. Adhesive silicone holders
Under-shelf holders with adhesive backing suit small laptop chargers and slim adapters. They are fast, but adhesive can lose grip on warm, dusty or textured surfaces. Use screws for anything you can't afford to see fall.
5. A dedicated power shelf
In a larger build, dedicate one ventilated shelf or the lower back corner to power. Mount a power strip and the bricks together, leave clearance for slack, and keep the zone open from the front or side. This is the cleanest option when you plan the cabinet from scratch, because the shelf, the cutouts and the airflow slots are designed together.
| Method | Best for | Airflow | Serviceability |
|---|---|---|---|
| Bracket on cabinet wall | Medium and heavy bricks | Good, on 3 to 4 sides | Easy |
| Hang by cord from hooks | Light bricks | Very good | Easy |
| Velcro or zip tie to rail | Mixed sizes, changing setups | Good | Easy with Velcro |
| Adhesive silicone holder | Small chargers | Fair, depends on spot | Moderate |
| Dedicated power shelf | New builds, many devices | Best when slotted | Easy if open-fronted |
Keep every brick serviceable
A cabinet planner's rule worth adopting: concealed power should stay serviceable. Provide access to the power unit and a deliberate cable path instead of trapping components behind fixed construction.
Bricks fail. Cords wear out, and you'll swap devices over the years. If replacing one means unscrewing a finished panel, you'll be tempted to leave a failing unit in place. Put a removable back panel, a lift-out shelf or a front-accessible power zone in the plan.
This matters most in a wall-mounted media wall, where bricks might otherwise end up inside the wall cavity. Keep the bricks in a ventilated, reachable cabinet or shelf, and run only low-voltage cables through the wall. Our overview of hidden wire management for a wall walks through the methods that work.

Route and organize the cables
Mounting the brick solves half the mess. The cords from each brick still need a tidy path.
Separate power from data
Schneider Electric's guidance for IT cabinets is to plan cable entry from the top or bottom and set separate routes for power and data, keeping the two apart as much as practical. Where they must cross, cross them at a right angle to reduce electromagnetic interference. In a home cabinet, a simple version works: power on one side, HDMI, Ethernet and optical audio on the other.
Bundle, sleeve and label
- Bundle related cables with reusable Velcro straps or sleeves and secure them with clips or mounts.
- Use braided fabric sleeves for visible runs and fabric-covered channels under desks.
- Label both ends of every cable. A label that says "router" saves you from unplugging the wrong brick at 11 p.m. Our guide to serviceable TV wall cable labels shows four labeling habits worth copying.
Plan slack on purpose
Bricks come with fixed-length cords, and the extra length has to go somewhere. Leave clearance behind the shelf for the power strip and cord slack, protect cutout edges with grommets or cord covers, and keep the strip reachable for maintenance. Before you close the cabinet, check that nothing is pinched, kinked or under tension. Too much slack is its own hazard, and we cover it in how precut kits tame cable slack.
Electrical safety inside the cabinet
This is where you shouldn't improvise. These points come from safety organizations, and they apply to any enclosed or semi-enclosed space.
- Seat plugs fully. Insert plugs completely so no part of the prongs is exposed, and avoid dangling cords where they can be tripped over or pulled down, according to the Consumer Product Safety Commission (CPSC).
- Respond to heat and tingles. Never use a cord that feels hot. If a device smokes, sparks or gives a tingle, stop using it and have it replaced or repaired by an authorized provider.
- Don't treat a surge protector as extra capacity. It doesn't provide extra power; it only increases access to the limited capacity of the circuit. Heavy reliance on strips, ESFI notes, indicates too few outlets for your needs.
- Keep extension cords temporary. CPSC says they should be used only when necessary and temporarily, not to make up for inadequate home wiring. If your cabinet needs a permanent run, a licensed electrician should add an outlet. For short-term needs, a heavy-duty extension cord with a lighted plug lets you see at a glance that it's live, but it is still a stopgap.
- Don't enclose bricks. Use open panels, slots or mesh so heat can escape.
Be careful with cheap replacement adapters
When a brick dies, the cheapest replacement can be the riskiest. UL tested counterfeit iPhone adapters and found that 397 of 400 failed electric-strength tests, because they lacked proper triple-isolation wire in the secondary windings. That was a test of one product type, not every cheap adapter, but the lesson carries over: buy replacements from the device maker or a reputable retailer, and match the specifications. Power supplies list their voltage, current and input range on the label, so read it before you plug in a substitute.
When you retire old bricks, don't toss them in the trash. A local electronics and e-waste removal service is one option if you're clearing a big pile, and your municipality's e-waste drop-off is another.
Perspective: plan the power zone first
We build media walls for a living, and the most common regret we hear is not the TV or the finish. It's the power. People plan the screen, the shelves and the lighting, then realize the router, the streaming box and six chargers have no home.
Our view is simple. Treat power as a component with its own zone, the same as the console or the soundbar. Decide where the bricks live before you cut a single panel. Keep that zone open to air and reachable without tools where possible. Keep low-voltage cables in labeled paths, and leave mains wiring to a licensed electrician.
That's why our kits are pre-cut and pre-labeled, with hidden wire management designed in. When the cable paths and the cabinetry come from the same plan, you aren't drilling through a finished panel to fit a brick. A modular system also means you can change the layout later without tearing out the wall.
— Jake
A cabinet layout that works
Here is a practical layout for a typical media cabinet with a router, a streaming box, a mini PC and a few chargers:
- Pick the power zone. Choose one back corner or one lower shelf, away from the TV's heat and out of direct sun.
- Mount the power strip first. Fix it to the back or side wall with screws, with room beside it for cord slack.
- Mount each brick with a bracket or strap. Keep 2 to 4 inches of open space around each, and put the heaviest on a bracket.
- Cut or drill vents. Slots in the back panel or a mesh insert above the zone let hot air rise out.
- Route power and data apart. Power on one side, data on the other. Cross at right angles if you must.
- Sleeve, bundle and label. Use Velcro bundles and labels at both ends.
- Run the heat test. After 30 minutes of heavy use, touch-check and measure. If you see a rise over 15 degrees Fahrenheit, add ventilation.
- Close and re-check. Confirm nothing is pinched or pulled tight, and that the power zone is still reachable.
What about a hidden cable box or set-top?
Set-top boxes have their own heat and their own remote-signal issue. If you're hiding one next to your bricks, read how to hide a cable box without blocking remotes or overheating before you finalize the layout.
Common mistakes to avoid
- Piling bricks on the cabinet floor. Heat builds on a solid surface, and tangled cords make it hard to unplug the right one.
- Closing the cabinet with solid doors and no vents. Open panels, slots or mesh are the safe choice.
- Stacking bricks on top of each other. Each one warms the next.
- Running cords tight around corners. Strain loosens connectors and can damage insulation.
- Chaining power strips. It adds load to one circuit. Add an outlet instead.
- Hiding bricks inside a sealed wall. You can't test, feel or replace what you can't reach.
Build the power zone into a media wall
If you're planning a new media wall instead of fixing an existing cabinet, you can design the power zone in from the start. Our DIY media wall kits are pre-cut and pre-labeled, with floating cabinetry, hidden wire management and integrated LED lighting options, so the cable paths are part of the plan. If you want help laying it out, we offer design services: a Single Concept Design at $99, a 3 Concepts + Revision Design Package at $199, and a Full Design & Quote at $299.

In the San Francisco Bay Area, we also offer white-glove installation if you'd rather not do the work yourself. For the extras that go with a build, browse our audio and visual accessories and media wall lighting. Lighting drivers are bricks too, so plan a home for them in the same power zone.
FAQ
Is it safe to put power bricks inside a closed cabinet?
Only if the cabinet has airflow. Bricks give off heat, and a sealed box traps it. Use open panels, slots or mesh, and keep 2 to 4 inches of free space around each brick. Test after 30 minutes of heavy use and add vents if the temperature rises more than 15 degrees Fahrenheit.
What are power bricks actually called?
The formal names are AC adapter, AC/DC adapter, power adapter or external power supply. When the device has a battery, people often call the same box a charger. "Power brick" is the informal term for the rectangular box on the cord, usually on a laptop or similar device.
Why do power bricks get so hot?
They convert wall-outlet AC into low-voltage DC, and some energy is lost as heat. Heavy loads, such as charging a laptop, produce more of it. Poor airflow makes it worse. A brick that feels too hot to hold, smokes or sparks should be unplugged and replaced, as ESFI advises.
How do I hide power bricks without drilling into my cabinet?
Use Velcro straps or zip ties to fasten bricks to an existing rail or shelf edge, or use adhesive silicone holders for small chargers. Keep them off the cabinet floor and leave air around them. For heavier bricks, a screw-in bracket is the more secure choice.
Can I use a power strip inside the cabinet?
Yes, if it's mounted with clearance for cord slack and kept accessible. A strip doesn't add capacity to the circuit, and heavy reliance on strips suggests you need more outlets. In that case, have a licensed electrician add one.
Sources
- Power brick definition, Dictionary.com
- What is an AC adapter, Lenovo US
- How to choose the right AC adapter, CDW
- Power supply, Wikipedia
- Hide Tech with Textiles, Homegoode
- ESFI Holiday Gift Guide: Protecting Big Ticket Items
- Universal Power Supply/Brick Wall or Cabinet Mount
- Planning Hidden Power Inside Cabinetry, RayArt
- Planning Effective Power and Data Cable Management in IT Racks, Schneider Electric
- Cabinet Cable Management guide
- Building a Shelf or Cabinet With Built-In Cable Management
- CPSC extension cord, power strip and surge protector warning
- ESFI Indoor Electrical Safety Check booklet
- UL, Counterfeit iPhone Adapters
- Heavy-duty extension cords with lighted plug, Polar Tool & Supply
- Electronics and e-waste removal, EZ Haulaway