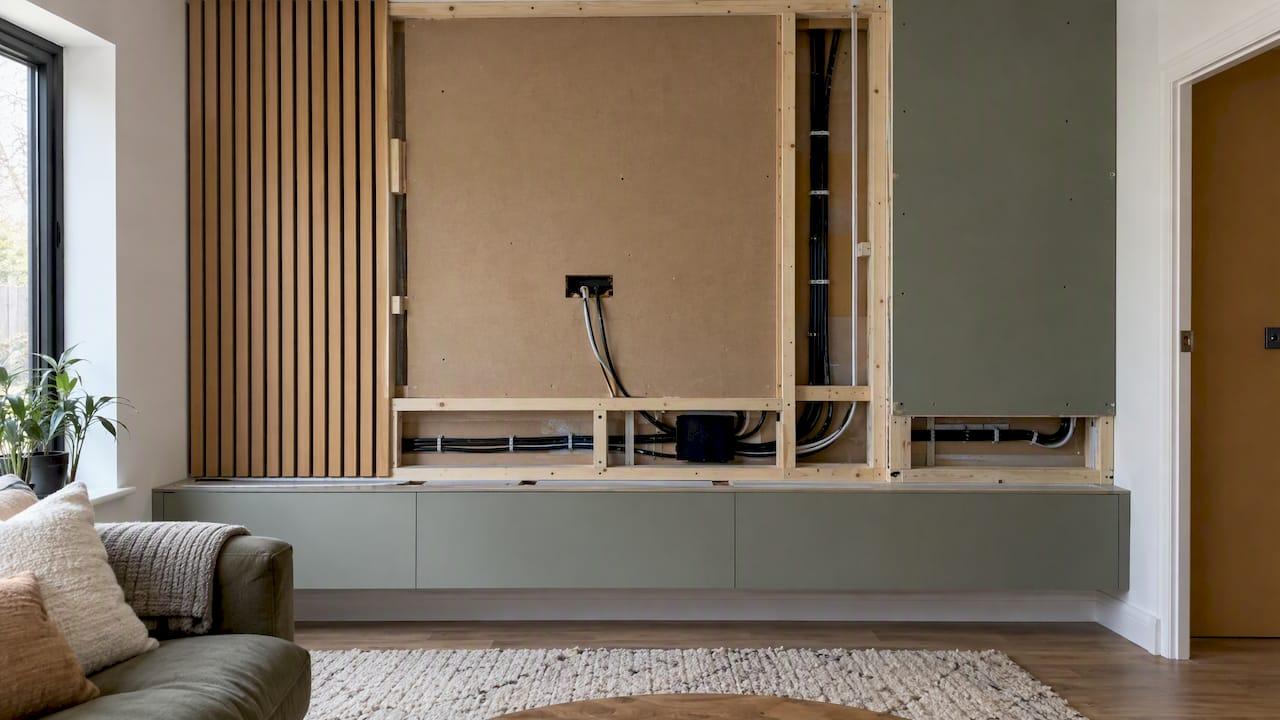
The cleanest way to hide wires on a wall is to run in-wall rated low-voltage cable through the cavity, bring power to the TV with a listed in-wall power kit or a real receptacle, and finish both ends with plates or a recessed box. Never bury a TV's factory power cord or an extension cord in the wall. Everything else is route planning, and on a media wall the best time to plan it is before the decorative panels go on.
This guide covers the methods, what each costs you in time and risk, the code rules that matter, and how to build hidden wiring into a slat-panel, floating-cabinet or fireplace wall so you can still reach it later.
TL;DR
- Low-voltage cables (HDMI, speaker, network) can live in the wall if they carry the right in-wall rating. Ordinary patch cables usually do not qualify.
- Power is different: a TV's flexible cord or an extension cord must not be run through the wall. Use a listed in-wall power kit or have an electrician install a receptacle.
- Plan the upper opening behind the TV and the lower opening near your equipment or an accessible cabinet, and test every cable before you close anything.
- Keep electrical boxes and splices accessible. Treat the cavity behind a media wall as an access system, not a sealed vault.
- On a new media wall build, hidden wiring is easiest while the framing and panels are still open.
Table of Contents
- What "hidden wire management" actually means
- Know the difference between cable and cord
- Four ways to hide wires, compared
- Plan the route before you touch the wall
- Keep it serviceable: boxes, splices and access
- Hiding wires when you cannot cut the wall
- Hidden wiring inside a media wall
- Perspective: why we design the wiring first
- Where our design help and kits fit in
- A realistic weekend plan
- Common mistakes
- FAQ
- Sources
What "hidden wire management" actually means
People use the phrase for three quite different jobs, and mixing them up is where projects go wrong.
- Surface concealment. Paintable raceways or covers that sit on the wall. Nothing goes inside the drywall.
- In-wall routing. Cables run inside the cavity between the studs, entering and exiting through cut openings finished with plates or boxes.
- Built-in concealment. Wiring planned into a structure such as a media wall, where cabinets, slat panels and a fireplace surround create their own chambers and pathways.
The first is the easiest and the least permanent. The second gives the tidiest result on a flat wall. The third gives you the most freedom, because you are building the wall and the pathway together.
Know the difference between cable and cord
The most important safety idea in this whole topic is not "hidden versus visible." It is building wiring versus equipment cords.
Low-voltage cable can go in the wall
HDMI, speaker wire, and network cable can be concealed when you use the right product. Crutchfield's in-wall wiring guide explains that common home-theater low-voltage options are marked CL2 or CL3, and that the required rating can change for plenum, riser, multifamily or other special pathways. It also warns that most ordinary audio/video patch cables are not suitable for in-wall use. The jacket marking matters more than the connector type.
Practical takeaway: read the printing on the jacket before you buy, and buy cable rated for the wall, not the shelf. We go deeper on this in our piece on whether in-wall rated cable is safe and legal for U.S. homes.
Power cords cannot
The TV's own power cord, or an extension cord, must not be pushed through a hole in the wall. Per the National Electrical Code language reproduced in Peerless-AV's in-wall accessory box datasheet, Article 400.8 prohibits flexible cords from being used as fixed wiring, run through holes in walls, or concealed by walls. The PowerBridge FAQ says the same in plain terms: running a TV cord or extension cord inside the wall is against the code and not worth the risk.
You have two legitimate options:
- A listed in-wall power kit (sometimes called a power bridge) that is built to carry power inside the wall.
- A properly wired receptacle behind the TV, installed by an electrician where required.
We break down both in two legal ways to power a wall-mounted TV. Local permitting and licensed-professional requirements can apply, so check with your building department before you cut into anything electrical.
Four ways to hide wires, compared
| Method | Best for | Wall cutting | Typical effort | Watch out for |
|---|---|---|---|---|
| Paintable surface raceway | Renters-turned-owners, solid walls, brick, fireplaces | None | Under an hour | Visible if not painted well; still no cord inside the wall |
| In-wall kit with grommets or plates | Standard drywall, one TV | Two small openings | Roughly 30 to 60 minutes per kit | Needs an open path between the openings |
| Full in-wall run with low-voltage boxes | Multiple cables, a clean look | Upper and lower openings | About 2 to 4 hours | Fire blocking, insulation, hidden utilities |
| Recessed media box | Streaming devices, extra HDMI length | One larger recess | A few hours | Needs stud spacing and depth to suit |
| Planned inside a media wall build | New builds, remodels | Panels not yet closed | Part of the build weekend | Must plan access before closing |
The time figures come from published guidance. The Home Depot's guide to running wires through walls describes a basic in-wall TV-wire job as an intermediate DIY project of about 2 to 4 hours. Manufacturer-listed kits sold through retail, such as this in-wall power and cable grommet kit, advertise around 30 minutes for a standard installation. Your own wall may take longer.
Plan the route before you touch the wall
Experienced installers will tell you the fish tape is not the hard part. The route is. The easy-looking path often fails at the wall itself.
Check what is inside the cavity
Horizontal blocking, insulation, spray foam, concrete and fireplace construction can all stop a fish tape. The Home Depot guide suggests inspecting the route first, and considering an adjacent closet, attic, crawlspace or pantry instead of cutting several access holes. A solid exterior wall or a masonry fireplace may be a good reason to choose surface raceway or call a professional.
Pick your two openings
For a hidden-wire wall, the upper opening belongs behind the TV, where the mounted screen covers it. The lower opening should land near your equipment, an outlet, or an accessible cabinet. Placing them this way keeps cables short and the finished wall free of visible plates.
Gear you will want
The same guide recommends a stud finder that detects studs, pipes and wires, a drywall saw or oscillating tool, a fish tape or glow rod, painter's tape, a level and a dust mask. Mark the TV position with tape first, locate studs and hidden utilities, and only then cut.
Test before you close
Test every HDMI and signal cable before the wall is finished. Long or awkward routes make replacement expensive, and a pull that felt successful can still leave a damaged or incompatible cable behind the finished wall. Plug in the TV and source, confirm picture and sound, then close up.
Keep it serviceable: boxes, splices and access
A professional-looking result depends on being able to get back in. A county residential handout based on the NEC, from Weld County's building department, notes that covered splices are not permitted and that boxes must remain accessible. Local code and permit rules still control, so treat this as the general principle, not a substitute for your jurisdiction's rules.
In practice that means:
- Terminate in-wall low-voltage runs at boxes or plates, not loose ends behind panels.
- Never bury an electrical splice behind drywall, slats or a wall covering.
- Write down or photograph your cable routes before the wall closes.
- Leave service loops where a device may need to be pulled out later.
Recessed media boxes
A recessed box solves two problems at once. It keeps plugs from pushing the TV away from the wall, and it gives streaming hardware a serviceable home. One example, a 9-inch recessed TV media box, is listed at 14.3 inches wide by 3.9 inches deep, designed to fit between 16-inch studs, with a stated 30-pound capacity and a $54.99 MSRP on its product page. A box earns its place when the design includes streaming sticks, excess HDMI length or a need for future access, not just a single cable pass-through. If you plan to tuck a streamer inside, our note on hiding an Apple TV in a media wall covers how much slack to leave, and hiding a cable box covers remotes and heat.
Hiding wires when you cannot cut the wall
Sometimes cutting is off the table: a solid wall, a lease you are about to end, or simply no appetite for drywall dust. Paintable raceways attach to the wall and baseboard and hide cords inside a flat channel, and they are the standard no-cut fix. They hide the cable, though they do not make it disappear, and the TV power cord still ends at a real outlet.

If you have a mounted TV and want to avoid opening the wall, we walk through options in hiding wires from a mounted TV without cutting walls. For the full cut-and-fish approach with safety steps, see our safe DIY guide to hiding TV wires in the wall.
Hidden wiring inside a media wall
A media wall is the best case for hidden wire management, because you build the wall around the wiring instead of fighting an existing one. Slat panels, floating cabinetry, LED strips and a fireplace all create chambers where cable can run without cutting into existing drywall.
The rule is to treat the concealed cavity as an access system, not a place to bury everything permanently. That is easy to say and hard to fix later, because without planning, reaching a cable can mean pulling off trim, slats, cabinets or a fireplace surround.
A planning checklist before panels go on
- Decide your equipment location. A floating console or accessible cabinet below the TV keeps cable runs short and cheaper, since quality cable gets pricey and HDMI can be fussy over distance.
- Place outlets deliberately. Behind the TV, inside the cabinet, and for lighting. We suggest planning for many more receptacles than you think you need, as covered in future-proof media wall outlet placement.
- Separate power from low voltage. Keep them apart as the listed equipment requires.
- Label every cable at both ends and photograph the open wall.
- Leave pull strings or conduit for any cable you may add later.
- Test the system with TV, source, speakers and lights on before closing the panels.
Fireplaces, lighting and smart tech
An electric fireplace and LED lighting add their own power needs, and smart devices add hubs that need airflow and Wi-Fi. Plan where each plugs in and where each can be serviced. Our electric fireplaces, lighting and smart tech pages show what we offer to go with a media wall.
Perspective: why we design the wiring first
When we talk to homeowners, the wall they love in photos is rarely the wall they regret. The regret is almost always the cable: a power cord that has to dangle, a streaming box that is walled in, an outlet in the wrong spot, a wall that cannot be opened without wrecking a finish.
That is why our kits are pre-cut and pre-labeled, and why we build hidden wire management into the design instead of leaving it for the end. The panels, floating cabinetry and slat accents are modular, so the cabinet or panel that hides your gear can also be the one that opens to service it. Our stance is simple: hide the wire, never hide the access.
We also keep the line between DIY and electrician clear. Mounting panels, routing low-voltage cable and planning pathways are weekend work for a careful homeowner. New receptacles, and anything that connects to building power, belong to a licensed electrician where your local code says so.
— Jake
Where our design help and kits fit in
If you are planning a new media wall and want wire routing settled before you buy, our design packages are built for that. A Single Concept Design is $99, a 3 Concepts + Revision Design Package is $199, and a Full Design & Quote is $299, all one-off, listed on our shop page. Our media wall kits come as pre-cut, pre-labeled panels with hidden wire management in mind, and in the San Francisco Bay Area we also offer white-glove installation. You can see how each route works on our How It Works page, and if you want a kit that supports a clean wiring path, our best TV wire management kit for luxury media walls article is a good next read.
A realistic weekend plan
Here is how a hidden-wire project tends to flow when you do it right.

Friday evening. Choose the TV height and equipment location. Locate studs and utilities. Confirm your cable ratings and your power plan, and decide whether you need an electrician.
Saturday. Cut the two openings or build the framing, run low-voltage cable with a fish tape or pull string, fit boxes or plates, and test every cable with the TV and source connected.
Sunday. Install any power kit or have the receptacle completed, mount the TV, then fit panels, cabinets and trim. Label and photograph before closing anything.
If you need a sightline plan for the room itself, our open-concept TV wall guide covers centering the screen in a weekend.
Common mistakes
- Using a regular HDMI cable in the wall. Check for the rating on the jacket.
- Pushing the TV's power cord through the hole. It breaks the NEC rule on flexible cords and is not worth the risk.
- Sealing a splice behind drywall or panels. Boxes must stay accessible.
- Skipping the test. Replacing a cable after the wall is finished is the costly kind of mistake.
- Cutting more holes than you need. A closet, attic or crawlspace route can replace several openings.
- Forgetting the future. One spare pull string costs almost nothing now.
FAQ
Is it legal to hide TV wires inside the wall?
Yes, with the right products. In-wall rated low-voltage cable and listed in-wall power kits are made for it, while a flexible power cord or extension cord cannot be concealed in a wall under the NEC. Local permit rules vary, so check with your building department or a licensed electrician for anything involving power.
Can I run an HDMI cable in the wall?
Only if it carries the correct in-wall marking, commonly CL2 or CL3 for home-theater low-voltage use. Many ordinary patch cables are not rated for it, and special pathways such as plenum spaces can require a different rating. Test the cable before closing the wall.
How long does it take to hide TV wires in the wall?
A basic in-wall job is about 2 to 4 hours according to The Home Depot's guide, and some retail in-wall kits advertise roughly 30 minutes for a standard install. Fireplaces, insulation and blocking can add time, or push you toward surface raceway.
What if I have a brick or fireplace wall?
Solid exterior walls and masonry can stop a fish tape, so surface raceway or professional help is often the sensible choice. A media wall built in front of the surface can create a new cavity for cable, with access planned in.
Do I need an electrician?
You do if you want a new receptacle behind the TV, or if your local code requires a licensed professional for the work. A listed in-wall power kit can avoid that for some setups, but follow the manufacturer's instructions and local rules.
Sources
- How to Run Wires Through Walls, The Home Depot
- How to hide the wires for your speakers and TVs, Crutchfield
- In-Wall Accessory Box datasheet, Peerless-AV
- PowerBridge FAQ on in-wall cable management
- In-wall TV power and cable grommet kit, The Home Depot
- 9-inch in-wall TV media box product page
- Basic Requirements for Wiring a Single Family Dwelling, Weld County